
C# Programmer
Eddy Grootenboer
I have two years of experience with C# Unity programming and released two indie games on Steam so far.
Contact me here:
About Me
Experience
Game producer with 5 years in indie development and a background in programming. Skilled in both leading development and building tools that improve workflow. Experienced mainly in C#, with some work in C++ and Unreal Blueprints.Notable Work
Contributed to the release of two indie games on Steam, focusing on feature development and internal tools.Focus
Passionate about creating engaging gameplay and improving systems through optimization, debugging, and iteration.Contact
Open to opportunities and collaborations.
Projects
Chess-Like Automated Testing

Solo Project
Date: March 2026
Time Spent: 5 weeksGraduation project:
Research and implementation of automated testing.
Chess-Like

Solo Project
Date: October 2025
Time Spent: 18 weeksSpecialization project:
Chesslike, a roguelike take on chess.
Warzone Survivor

Solo Project
Date: September 2024
Time Spent: 6 weeksFirst school assignment.
Vampire survivor-like game
Pixel Petals

Solo Project
Date: November 2023
Time Spent: 25 weeksFirst solo Steam release. A relaxing 2D flower-planting and crossbreeding game.
Vanta

Group Size: 15
Date: November 2022
Time Spent: 4 weeksCo-op puzzle game where players embody Light and Shadow in an underground civilization.
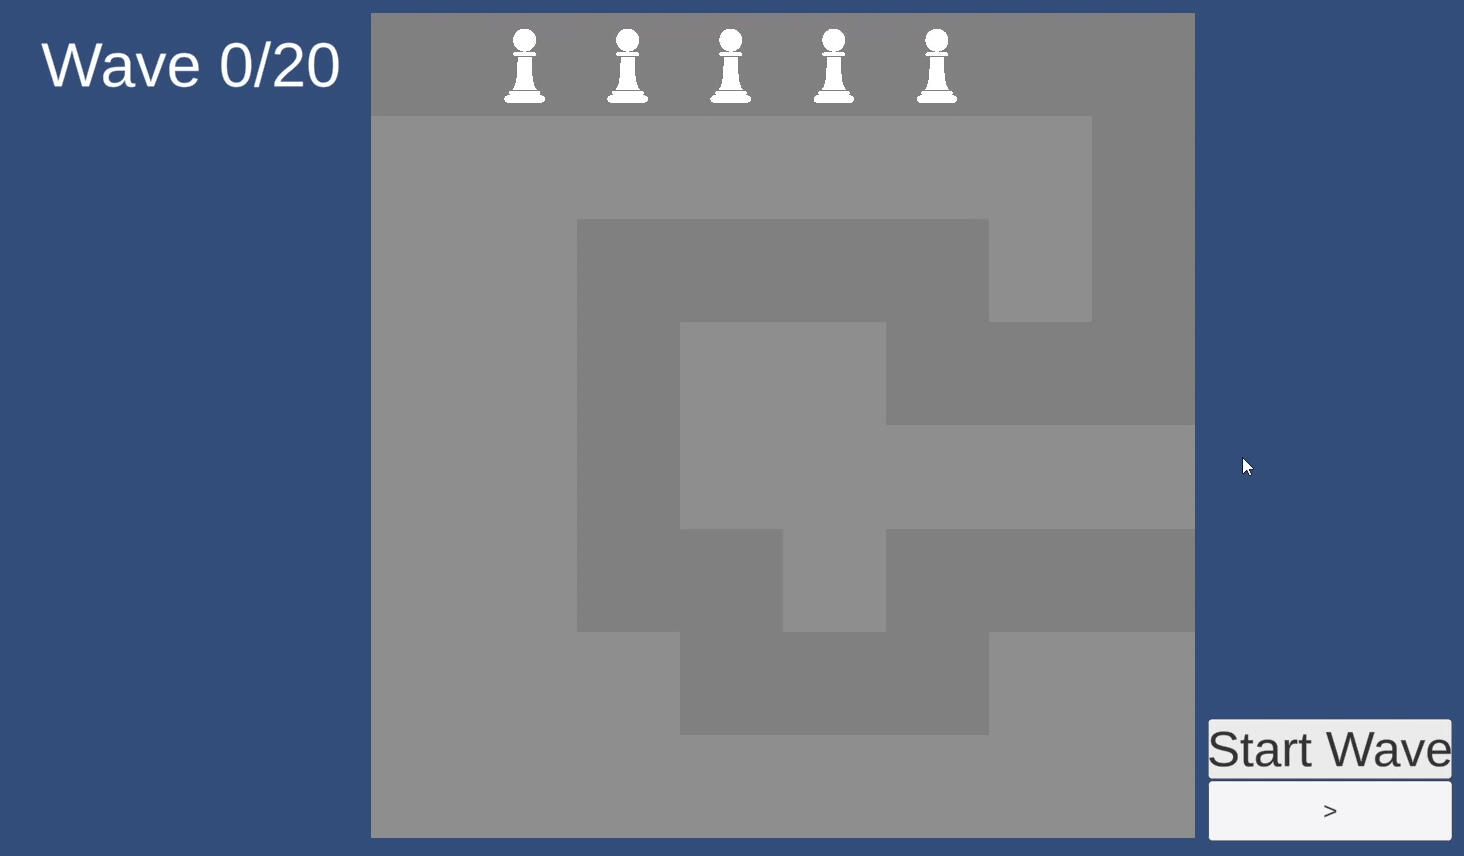
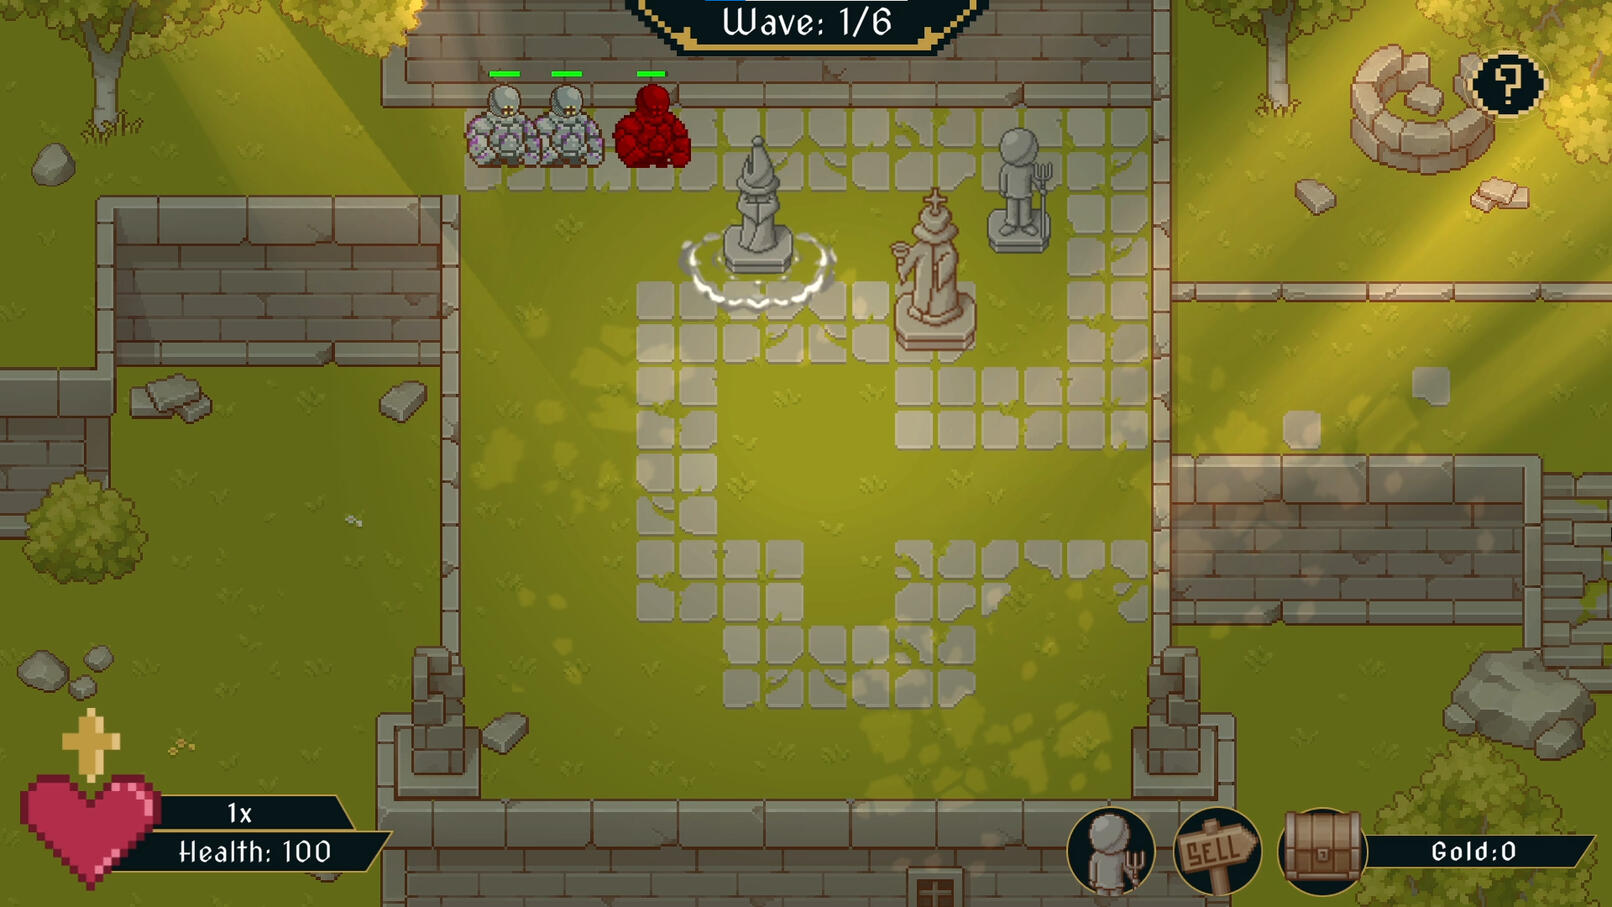
Protect The King

Group Size: 13
Date: October 2022
Time Spent: 4 weeksGrid-based tower defense with a chess theme. My first group project during studies.
Not Started Yet

---
Not Started Yet

---
Mini Projects
Catmarine

Group Size: 5
Date: March 2025
Time Spent: 3 daysOnline multiplayer game-jam game
MTG Booster pack opening

Solo Project
Date: July 2024
Time Spent: 3 daysA project where you can download any set from the Scryfall and open booster packs
Game Of Life

Solo Project
Date: June 2024
Time Spent: 2 daysConway's game of life
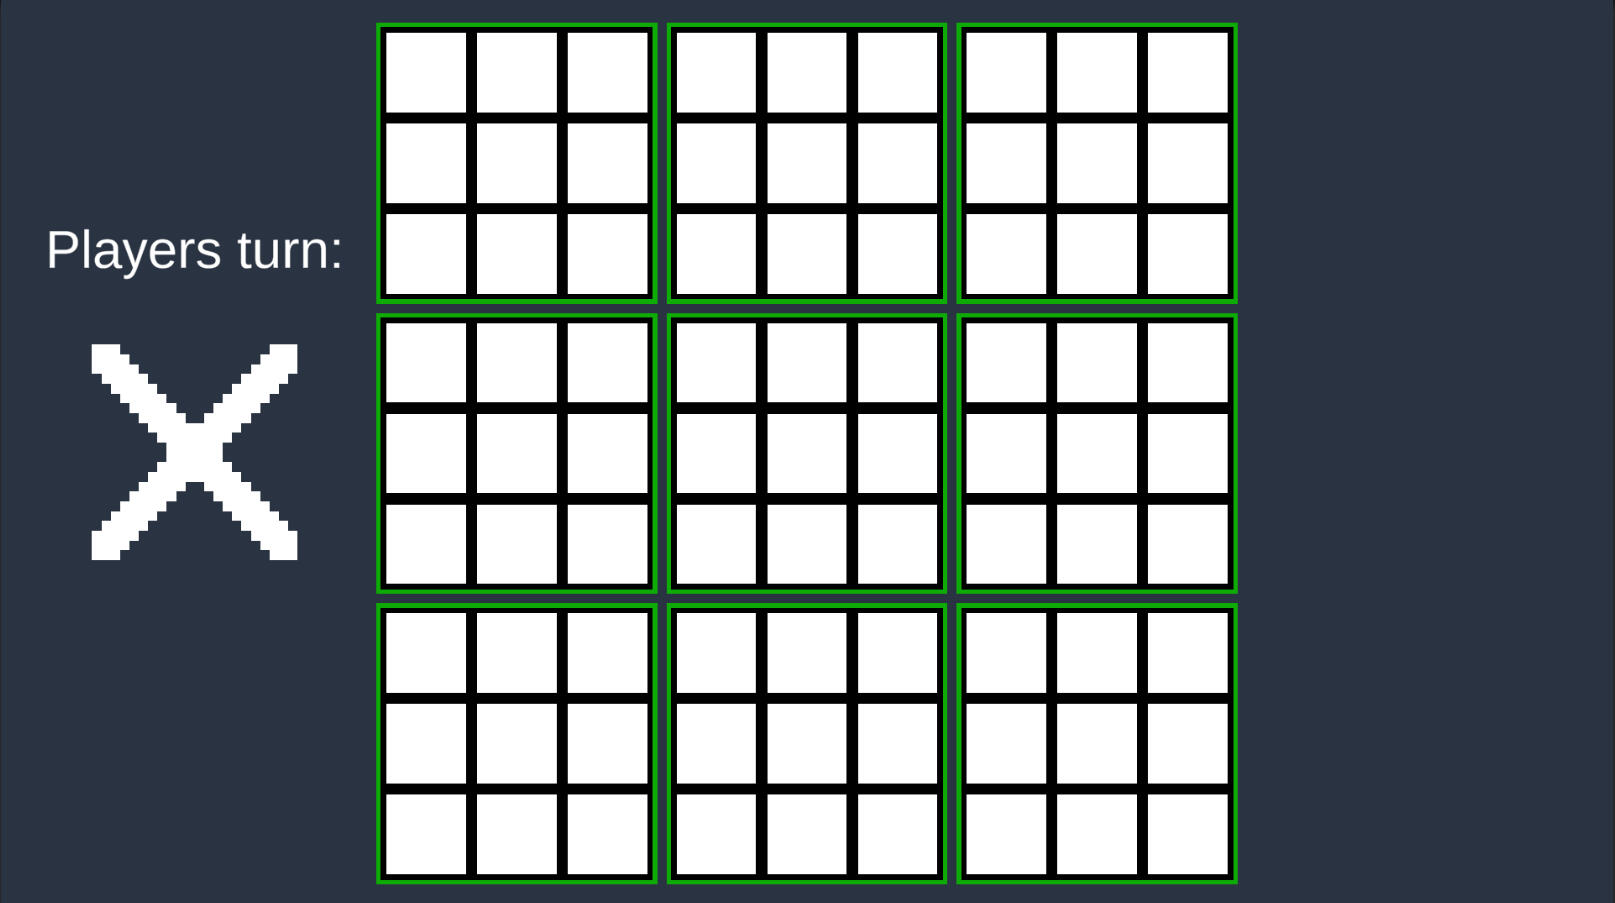
Super Tic Tac Toe

Solo Project
Date: August 2023
Time Spent: 5 daysSuper Tic-Tac-Toe: 3×3 boards with online multiplayer


Protect The King
This was the first group project I worked on while studying at Future Games. This project started in the fifth week of the education. With so little time learning code, I was very nervous. I had to work together with other programmers, designers, and project managers to make a game in 4 weeks. The initial idea of the game was that it would be in 3D, but after 2 weeks of 3D not working out, I was tasked with prototyping a 2D version.
Contributions:
2D Grid System
Enemies
Tower placement

2D Grid System
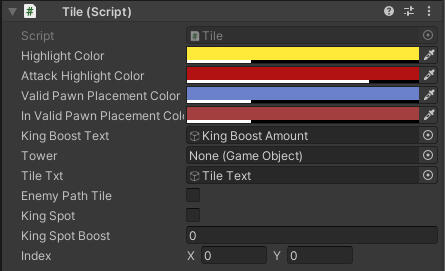
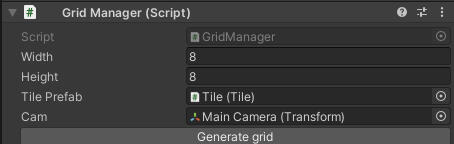
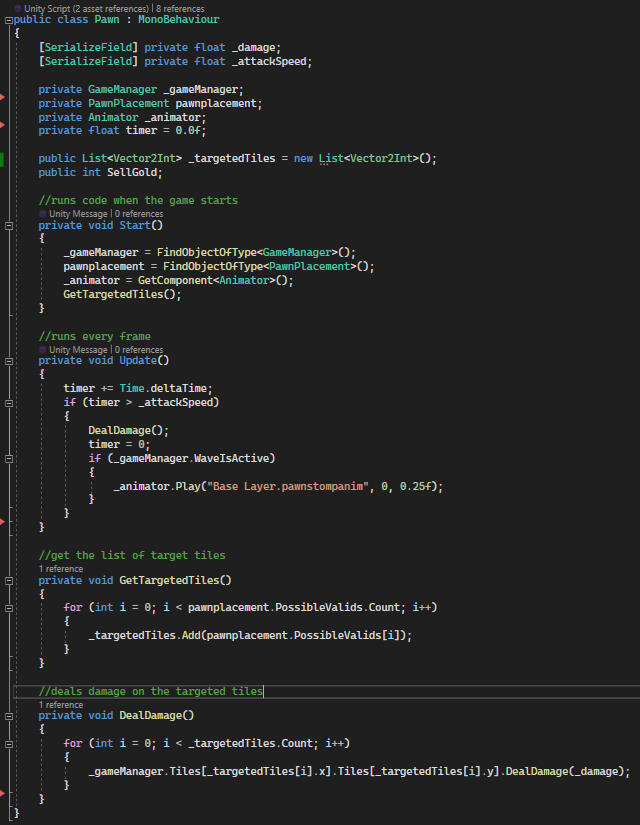
I started working on the 2D grid component. The first thing I created were the tiles themselves. I followed a tutorial that used different objects for highlighting and changing the tile's color. I didn't fully like that system, so I chose to use one tile and change the sprite color. In addition to changing color, I made it so that the tiles can be set with a boolean value indicating if they are a path tile or not. After making the tiles, I needed to spawn them in a grid in the center of the camera. I didn't make them spawn on start due to not knowing how to set up the walkable path from a list or scriptable object.I added on-enter and on-exit triggers on the tiles to detect if the mouse is hovering over the tile, which will then tell the game manager if the tile is currently being hovered. I also change the color of the tile if it's hovered over.
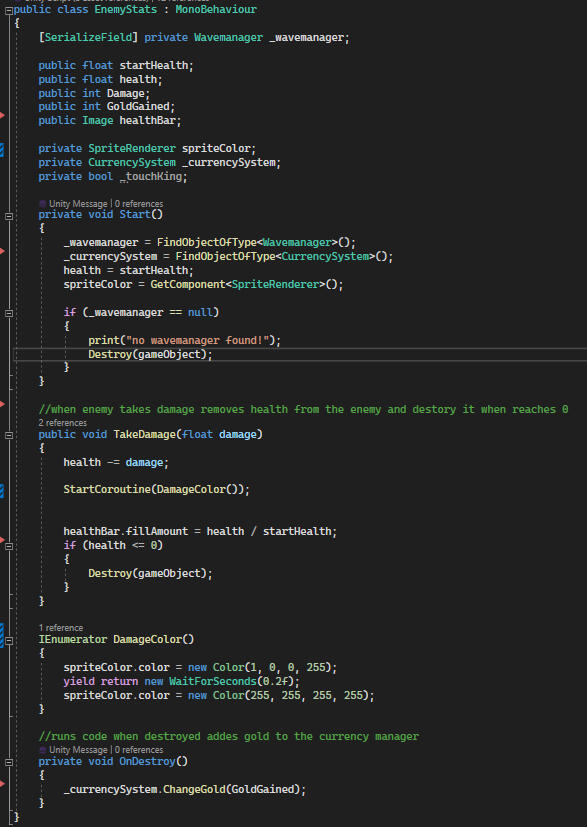
Enemies
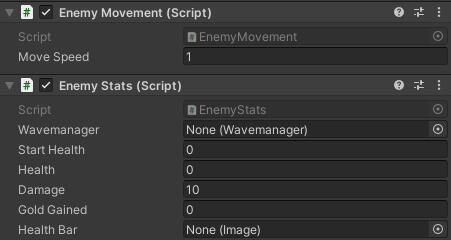
The EnemyMovement script controls how enemies move in the game. When the game begins, it figures out where they should go and starts moving them along their path.The HandleMovement function decides where the enemy should go, and the Move function makes them move smoothly from one spot to the next. This makes it look like they're moving seamlessly through the game world.The EnemyStats class looks after the enemies' stats and actions. When an enemy appears, it sets up things like how much health they have and how much damage they can do.When enemies get hurt, the TakeDamage function reduces their health. If their health drops to zero, they disappear.To show when enemies get hurt, the damageColor effect briefly changes their color.And when an enemy disappears, the OnDestroy function gives the player some gold as a reward for beating them.

Tower Placement
I began by integrating drag-and-drop UI elements into the codebase. Upon grabbing the object, it notifies the GameManager about the tower piece being dragged, subsequently disabling the UI element's raycast target. This allows the GameManager in know the hovered tile accurately.Upon releasing the tower, the UI element's raycast target is reactivated, and the tower is returned to its original shop location. Additionally, the system verifies whether the player possesses sufficient funds and if the placement is valid, ensuring it's not on a designated path or an occupied position. If all conditions are met, the tower is instantiated and initiates its designated function, dealing damage to the indicated tiles upon purchase.Also i didn't know what inheritances was back here so everything was its own script.

Conclusion
This project was my very first step into making games, and I’m really proud of how it turned out. At the start, I barely knew where to begin and only had four weeks to finish, with the last two weeks being the most intense. Starting from nothing was definitely the hardest challenge, but it pushed me to dive into Unity and discover how much I enjoy building with grids.Through this project I not only learned how Unity truly works, but also uncovered my love for grid-based games. That discovery has stuck with me and even inspired me to create my own grid-based game on Steam afterwards.Looking back, there are definitely things I would approach differently now, such as optimizing tower placement and making upgrades easier to expand, but those lessons are exactly what made this such a valuable experience. This project lit the spark for my journey in game development, and I’m excited to keep building on what I started here.
Credits:
| Project Managers | Designers | Programmers |
|---|---|---|
| Alexander Jakobsson | Frank Ortega | Eddy Grootenboer |
| Ali Al Dakhil | Devrim Kara | Alexander Schöllin |
| Alexander Kågström | Hampus O. Ström | Oskar D. Sundström |
| Hamza Özder | Anton Öberg | Milton Holmgren |
| - | Rusland Biba | - |
Contributions:
Light System
Interactables
Light System
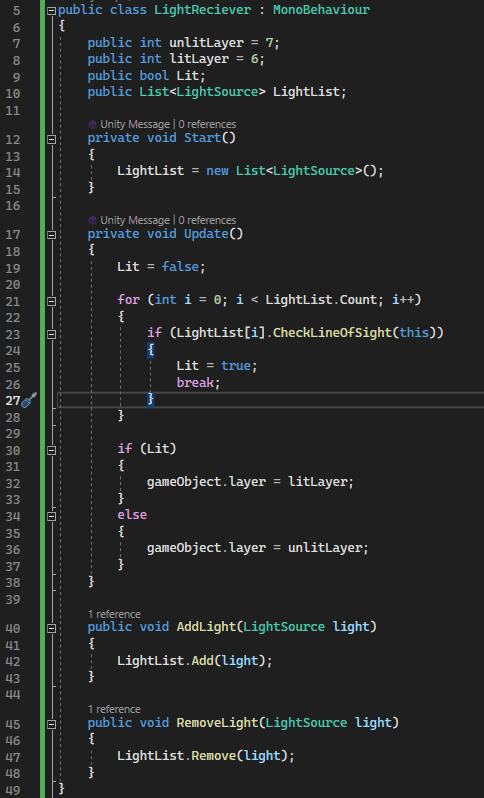
The light system is mostly made up from 2 scripts the LightSource and LightReciever. The LightSource has a trigger that is the same range as the light. When an object enters this trigger it will do a check to see if that object has a LightReciever script and if it does will add the LightSource to a list in the LightReciever script on that object.The LightReciever on Update will check if any LightSource in its list is within line of sight of the LightReciever's object using a ray cast. I do this by looping over all LightSources in the list. If a LightSource is true I set Lit to true and break the loop, otherwise i set it to false.Lastly i set the collision Layer of the LightReciever game object to the corresponding Layer.
LightSource
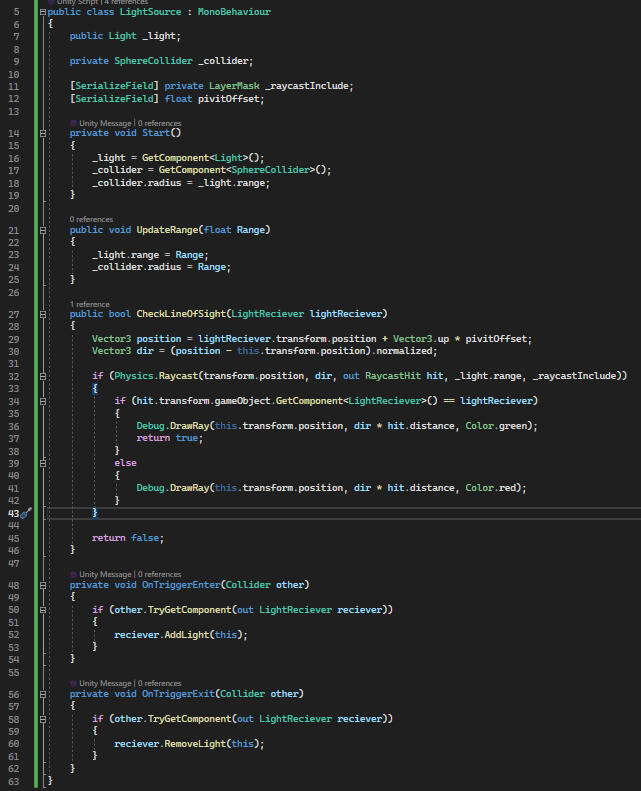
LightReceiver
Credits:
| Project Managers | Designers | Programmers | Art | QA |
|---|---|---|---|---|
| Alexander Jakobsson | Gustav Englund | Eddy Grootenboer | Max Niva | Christian Oja |
| - | Jonas Moström | Jesper Lundquist | Yasmine Lindberger | - |
| - | Hugo Lind | Linus Gråhammar | Elmina Nilsson | - |
| - | Kim Romsri | Sergei Maltcev | - | - |
| - | Emma Höggren | Daniel Broomé | - | - |
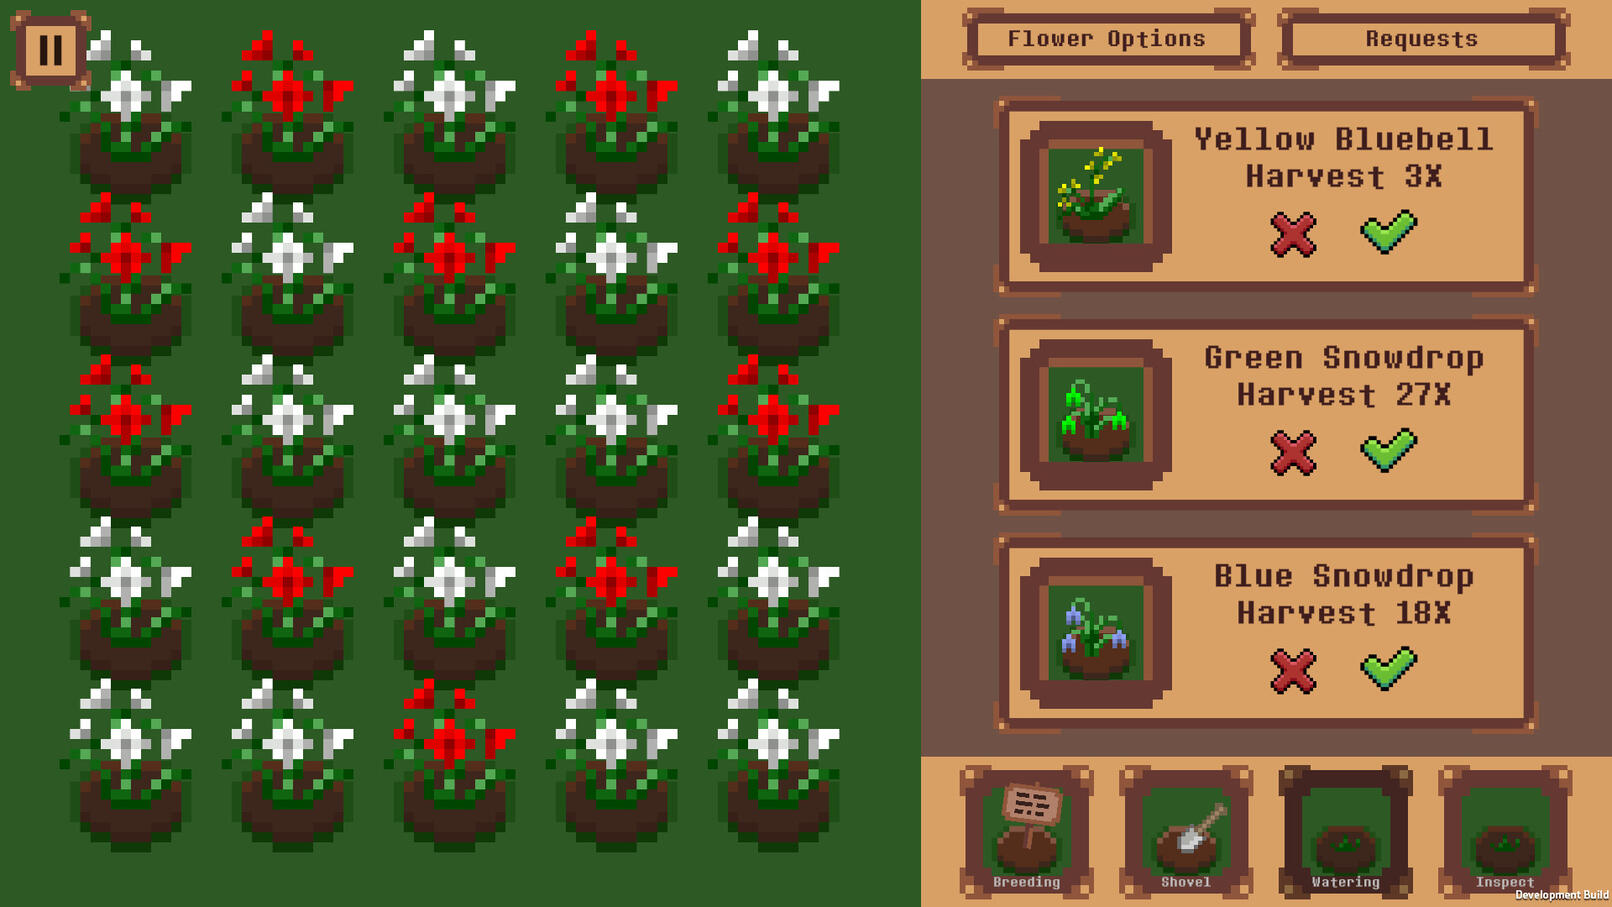
Pixel Petals
Pixel Petals is a 2D farming Sim. Crossbreed flower colors to discover new colors. complete quests to upgrade the stats of the flowers.This game I worked on during my education with a lot of breaks for other assignments. Time spend on the game with breaks was about 1 year.
Features
Editor Tool
Data Lists
State Machine
Achievements


Editor Tool
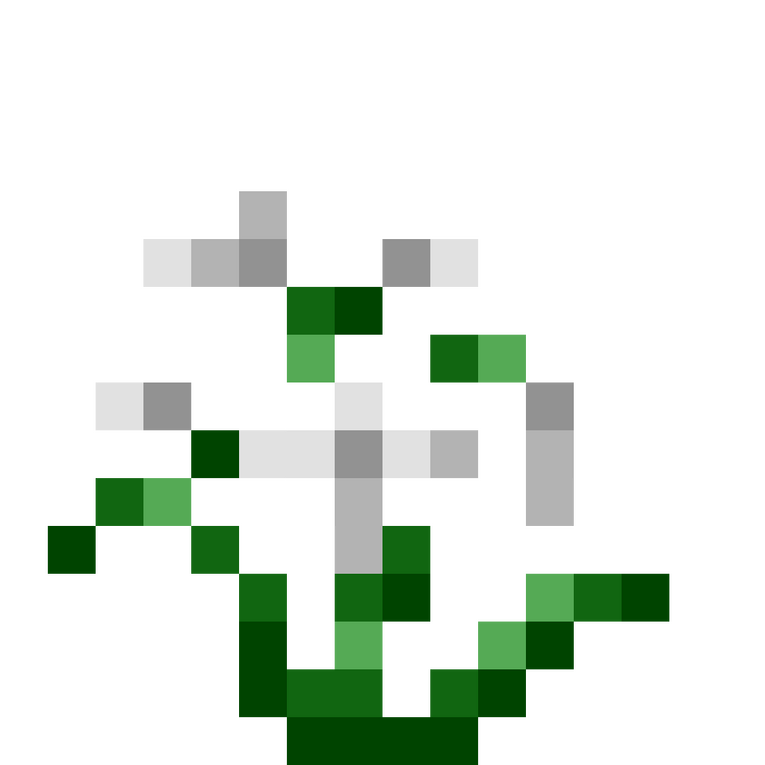
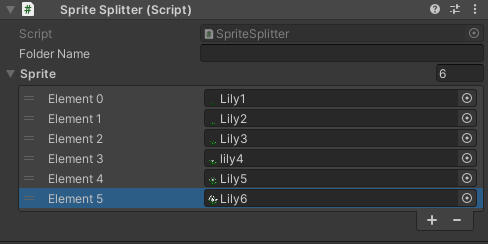
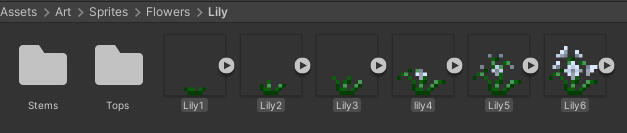
This project includes one editor tool, which I was very happy with how it turned out. I created this tool to reduce the time it took me to create flower art assets. In simple terms, it splits the white-colored pixels and the green-colored pixels.I have a string where I can add the folder name I want the tool to create. Then, I can add my sprites to a list. When I start the tool, it will grab the first sprite in the list and create two blank sprite assets: one named "white" and the other "color." Then, I go over the original sprite pixel by pixel and detect if the color value is more than 0.4 on R, G, or B. If it is, it will set the pixel on the "white" texture; otherwise, it will set it on the "color."After that, it will save the files in the folder for sprites with the sprite folder name.It will repeat this process for each sprite asset in the list.


Data Lists
After finishing this project, I learned about Scriptable Objects but didn’t use them in this project.I have three types of data that are repeated throughout the game. To avoid setting them up in every place I needed them, I created Singleton Data lists. These lists are in the Game scene and hold data such as colors, flower types, and color combinations.Color List:
The color list contains a struct that holds the name of the color as an enum and the color itself. So if I ever want the color red, I can reference the list, and that specific shade of red gets used. This is very handy because now, if I want to change a color, I only have to change it in one location.Flower Type List:
The flower type list isn’t just a list of flower names; it also holds the sprites used in the project. The list has two simple functions: one to get the top sprite and one to get the stem sprite. After receiving these, I can use code to alter the color using the color list.Flower Color Combinations List:
Lastly, the flower combination list holds the combinations of flower colors. If the player crossbreeds colors, it checks if the player has a valid combination and then has a small percentage chance to get the new color.


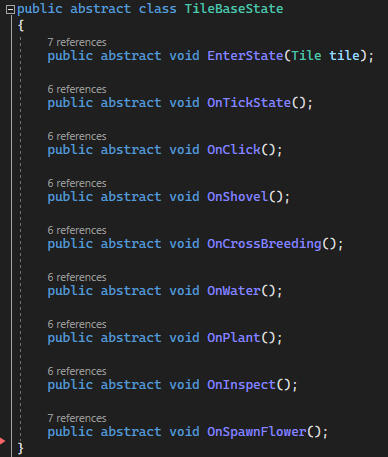
State Machine
State Machine
Each tile in the grid has its own state machine: Idle state, Growing state, Grown state, Decayed state, and Crossbreeding state.The Idle State
The tile will wait until a seed has been planted on it and has been given water. Once the requirement has been fulfilled, the tile will transition to the Growing state.The Growing State
The growing state is where the flower will take a certain amount of time to grow depending on its stats. A flower has six stages of growth and once it finishes the last stage, the tile will switch to the Grown state.The Grown State
the flower will be ready to harvest and start a timer before it decays, making the flower not count towards requests. Once the timer reaches zero, it will switch to the Decayed state.The Decayed State
Holds the flower to be removed, as it won't be able to be saved. The player must remove the flower and plant a new one. When removing the flower, the tile goes back to the Idle State.The Crossbreeding State
The crossbreeding state is where the tile will check its neighbouring tile if it has any fully grown flowers on it. If it has two or more grown flowers adjacent, it will try to combine the colors and create one of the 25 premade colors if the combination matches. If it fails, it will plant a flower that's the same color as a random one from the neighbours.
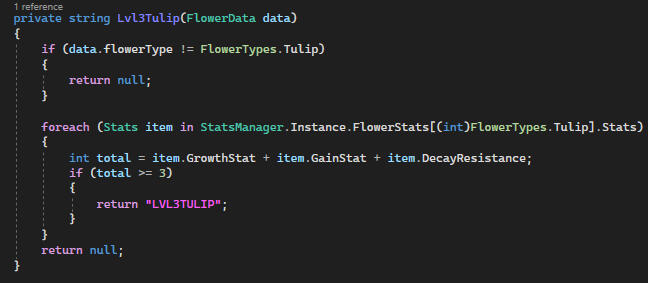
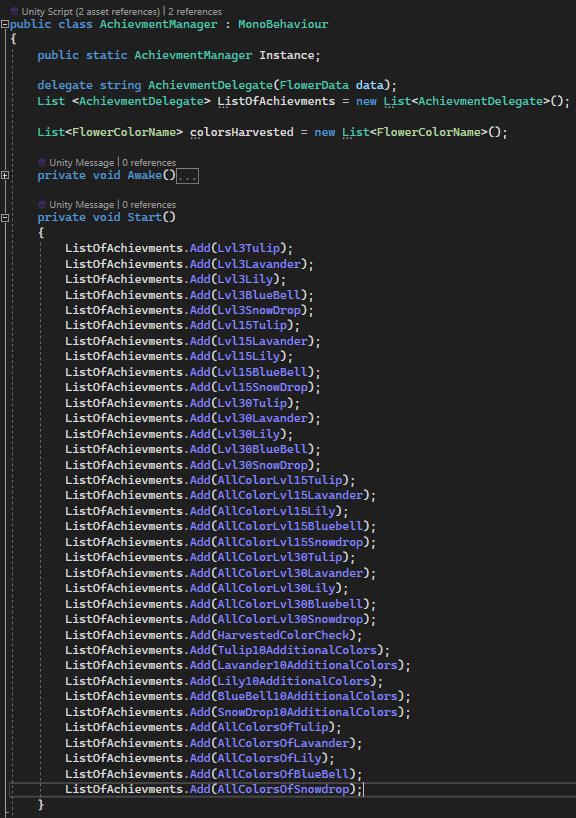
Achievements
Steam achievements were the last thing I added to the game before polishing. Looking back, it's not the best system I’ve created, but it’s a learning moment, so I decided to include it in my portfolio.I started with a list of delegates, where at the start, I added every single hard-coded achievement check function into the list. If I were to do this again, I would look into making it more dynamic.
Conclusion
This project is one I worked on for quite a while, with some breaks in between because of school assignments. It really showed me what it’s like to build a game from nothing and actually release it. I got to see firsthand all the details you need to fix and the unexpected problems that come up, which you can’t just leave behind.I discovered how useful planning can be, but also that you shouldn’t get stuck on the design alone. The important thing is to make it work, and if it doesn’t feel right, figure out why and adjust your plans.Something else I learned during this project is how valuable it is to create small tools that make development easier. Having tools that help both programmers and designers really speeds things up and makes the process more enjoyable (and since I was also the designer, I got to experience both sides).
A* (Astar)
A* is a small project I undertook when I needed a break from my main project, Pixel Petals. I spent about 2 days on this project, and it was enjoyable. I followed a tutorial from redblobgames. Initially, I was quite confused, as my familiarity was only with C#, and now I had to delve into Python. I began by thoroughly reading the entire document to grasp what I was about to create. It was enlightening to realize that I would be implementing three algorithms, providing me with a comprehensive understanding of how it all functions. However, I also acknowledged the need to improve my skills in capturing progress through clips and pictures.
A* Experience
My goal with this project was to understand how A* works and see if I could use the pathfinding system in a fun way, like in a tower defense wave. I was pleasantly surprised by how well it worked and how little help I needed from my friends to get the hang of A*. It was really cool to see it all come together and actually perform well in real-time.The only issue I’m running into now is figuring out how to expand this to bigger grid sizes. I’m starting to notice some performance hits, which makes me think I should dive deeper into optimizations, especially in how I create and manage the grid.Next, I plan to look into more efficient ways to handle larger grids and maybe even experiment with different pathfinding algorithms to see if I can push the system even further.
Version 1
Game Of Life
I asked some of my friends for a good coding practice, and they recommended "Conway's Game of Life." So I tried it, and here are the results.I worked on two versions because my first version was very laggy and needed optimization.Here are the basics of "Conway's Game of Life":
Every cell interacts with its eight neighbors, which are the cells that are horizontally, vertically, or diagonally adjacent. At each step in time, the following transitions occur:1. Any live cell with fewer than two live neighbors dies, as if by underpopulation.
2. Any live cell with two or three live neighbors lives on to the next generation.
3. Any live cell with more than three live neighbors dies, as if by overpopulation.
4. Any dead cell with exactly three live neighbors becomes a live cell, as if by reproduction.
Version 1
For the first version, I spawned 240 × 135 "tiles," each with its own script and functionality. Each tile had its own set of responsibilities: checking its neighbors, recoloring the texture of the tile sprite, and tracking its coordinates, neighbors, alive status, and status colors.But with 32,400 "tiles" running code every frame, I quickly realized that this approach was a bit of a performance nightmare. It didn’t take long to see that I needed a more efficient solution, so I started digging into ways to optimize the system.
Version 2
For the second version, I switched things up by using a single sprite with one texture and directly modifying the pixels based on each cell's alive status.To get this working, I needed a way to paint on the texture, so I reached out to my friend Christian Bäckström, who generously shared the code to make that happen.I also streamlined the system by storing all the cell statuses in a single boolean array. This allowed me to consolidate status checks into one efficient function.On top of that, I added a few cool features: you can now pause and resume the game with the space bar, randomize the field with the R key, and clear the entire grid with the C key. These additions make the game much more interactive and fun to play.
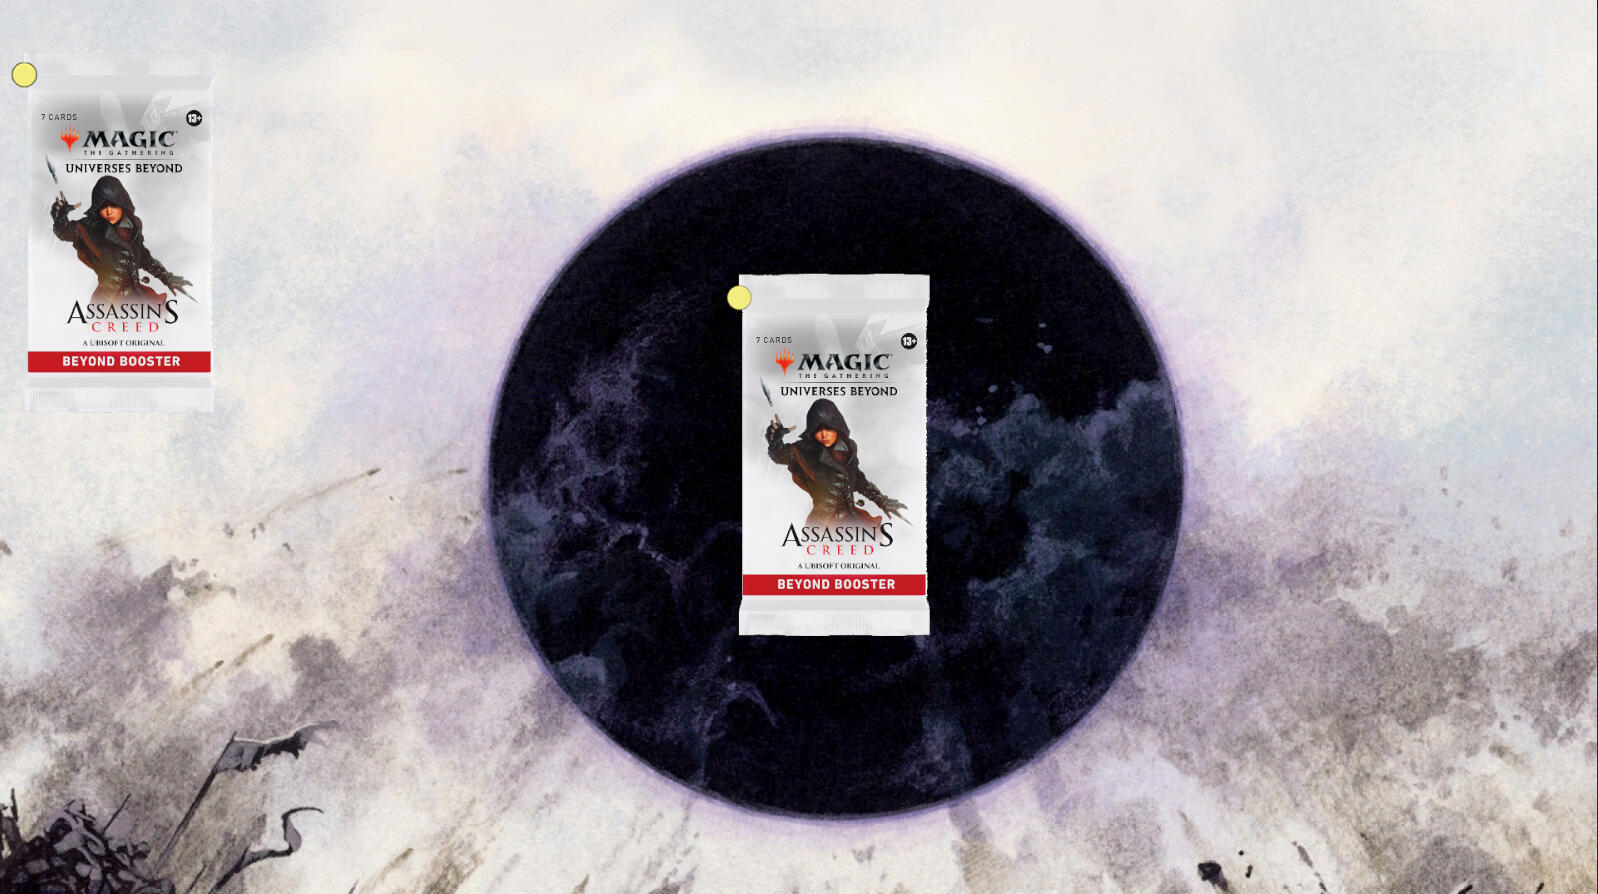
Magic the gathering booster pack sim
I have always enjoyed opening magic the gathering booster packs but they are expensive. So I wanted to open them without having to pay for them (and not having to resort to crime.) I had a couple of challenges set for myself.
1. Make it easier to get the Data of the cards in a set
2. Make getting images into the project easier.
3. Make booster packs be able to hold different combination of cards.
Getting the card data
To get all the data, I use Scryfall's API. To prevent downloading all Magic cards in existence, I use their set code to retrieve only a specific set, which I then download as a complete set of data into a large list of card data.After gathering all the data, I end up with a large list full of detailed card information. From there, I transfer this data into my own more condensed card structure, focusing on key variables like price, rarity, and cardImageURL. This allows me to store only the essential information I care about for the project. I then store these cards in a scriptable object that holds a list of each card.
Image of card data


Getting the card images
To gather all the images for the cards, I wanted to avoid the tedious task of downloading and uploading each one manually. Since I already had the image URLs from collecting the card data, I wrote a custom editor script to automate the process. This script downloads all the images from a scriptable object, names them appropriately, and assigns them to the correct card data.To prevent making too many API calls and risking a ban, I included a delay between each download. The script then saves the images in the correct folder, checking if an image already exists before downloading. If the image is already in the project, it assigns it; if the image is already linked to the card, the script skips it. This automation saved a lot of time and ensured that everything was organized efficiently.
Creating the booster packs
In Magic The Gathering, cards come in four different rarities: common, uncommon, rare, and mythic rare. When creating a booster pack, the entire card set is sorted into eight distinct lists, with each rarity divided into two categories—normal cards and land cards.Each booster pack is defined by a scriptable object called a CardSlotChance. A CardSlotChance specifies the possible rarities for a card slot, which can include multiple rarities. It also includes two important booleans: the first determines whether the card can be a land, and the second forces the card to be a land.When it’s time to choose a card for a specific slot, the script checks these three factors: the allowed rarities, whether the card can or must be a land, and the predetermined weight value for each rarity. Based on these criteria, eligible cards are added to a card pool. Finally, one random card is selected from the pool according to the weighted chances, ensuring a balanced and exciting pack-opening experience.
Finished result
Super Tic Tac Toe Online
While learning about networking for games, I wanted to create a game rather than just connect two clients and send a message. After some research, I came across a game called Super Tic Tac Toe, which looked very interesting.Basic Explanation:
Super Tic Tac Toe takes the simple concept of Tic Tac Toe and expands it into a more strategic and complex game. It’s played on a large 3x3 grid of smaller 3x3 Tic Tac Toe boards, where each move you make on a small board determines the specific small board where your opponent must place their next mark. The goal isn’t just to win on a single small board, but to secure three small boards in a row on the larger grid, either horizontally, vertically, or diagonally. This adds a significant layer of strategy, as you not only have to think about winning individual boards but also about how your moves impact the overall game. It’s a game of both offense and defense, requiring players to anticipate their opponent’s strategy and control the flow of play to secure victory on the larger grid.
Basic setup
I started with a single tile from a standard tic-tac-toe game. I added the functionality to display an X or O and included a check to ensure the tile hadn’t already been used. In hindsight, I could have simply checked the symbol status, but the method I used worked fine.Next, I moved on to the full tic-tac-toe game, which consists of a 3x3 grid of individual tiles. I added functionality to highlight the squares that are available for play. I also implemented checks to determine if the game had been won, lost, or tied. Finally, I added the feature to display the winner of that particular tic-tac-toe game.Lastly, I tackled the Super Tic-Tac-Toe game. This primarily involved setting up the win checks for the Super board and linking the smaller boards accordingly.
Multiplayer aspect
To enable multiplayer functionality, I used a template for the lobby system. Unfortunately, I don’t have anything to showcase for that part as my own work. I’m quite disappointed about this because my understanding of this component is lacking. While I grasp some of it, it would have been more beneficial to develop it myself.The game manger handles the multiplayer aspects of a Super Tic-Tac-Toe game in Unity, utilizing the Unity Netcode framework. It manages several key functions:1. Turn Management: The script keeps track of whose turn it is, alternating between players after each move. It uses server-side logic to ensure that the turn order is synchronized across all clients.2. Network Synchronization: It synchronizes critical game states—like player turns, UI updates, and game board changes—across all connected clients. This is managed using ServerRPC and ClientRPC calls.3. Input Handling: On the client side, the script processes player inputs, checks if a move is valid, and then sends that move to the server for validation and execution. The server updates all clients with the new game state.4. AI Integration: If only one player is connected, or if the game mode includes AI, the script can take control of the second player's turn, allowing the AI to make moves automatically based on a simple win-checking algorithm.5. UI Management: The script updates the UI to reflect the current player's turn and hides unnecessary UI elements at the start of the game to focus on gameplay.
Warzone Survivor
Warzone Survivor was the first assignment given at the start of my programming education. The goal was to create a simple, Vampire Survivors-style game, focusing on core mechanics like player control, enemy interactions, and game progression. Below is a summary of the key features I implemented during the development of this project:- Player movement across the screen
- Player can die and reset the game
- Player levels up after reaching XP thresholds, unlocking upgrades
- Camera follows the player’s movement
- Enemy AI that independently moves toward the player
- Enemies spawn over time and can be destroyed by the player
- Three distinct enemy types with unique characteristics
- Enemies drop XP on death, with a UI to track XP
- Game pause function and main menu with start and settings options
- Increasing enemy difficulty as the game progresses
- High score tracking in the main menu
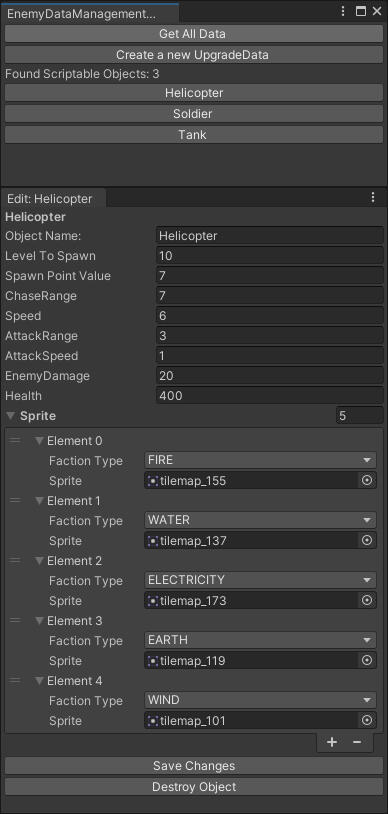
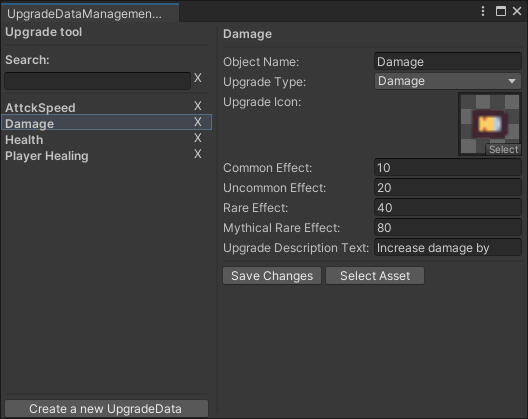
- UnityEditor tools to create new enemy types and upgrades easily
Main game loop
The game loop has five enemy factions and one player faction. Each faction fights to earn XP and level up. As you take on enemies, they’ll get stronger, so you have to change your tactics.When the player levels up, they can pick a reward that suits their playstyle, like more health, better damage, or new abilities. Enemies also get a stat boost, which keeps the game challenging.As a solo player in this war simulation, you need to scout the area and decide when to fight or run. You can focus on taking down certain enemy factions or target weaker enemies to rack up XP quickly.The game is fast-paced and intense, with enemies constantly coming at you. You’ll have to dodge attacks and make quick decisions to survive. Every choice matters, and the enemies will react to your actions, so stay on your toes!
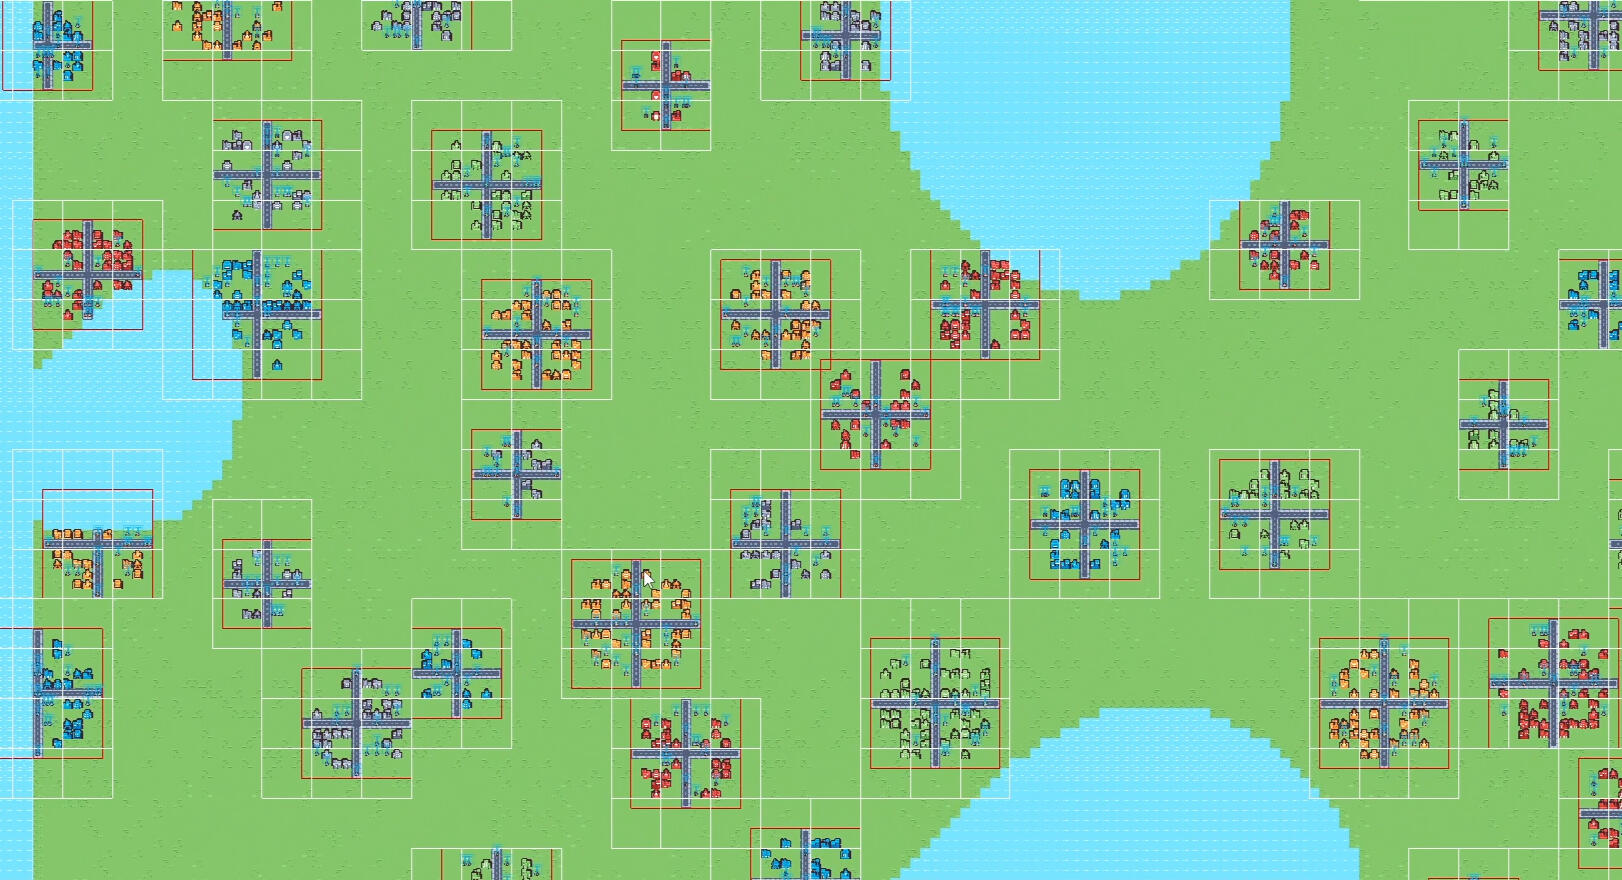
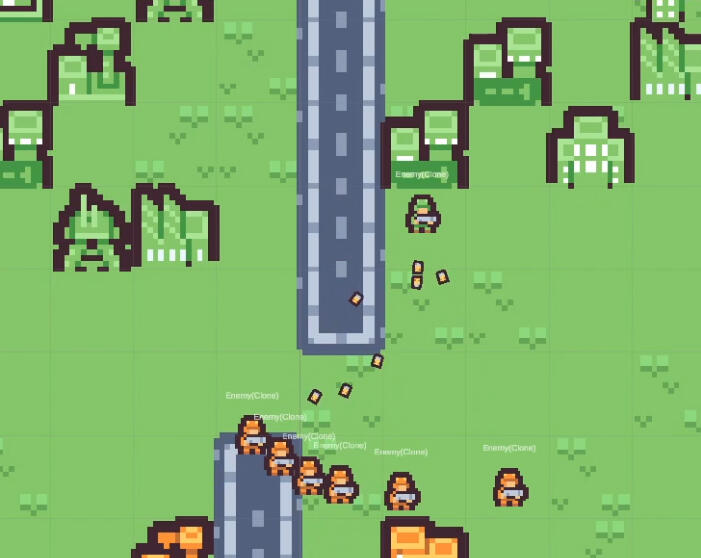
Map Generation
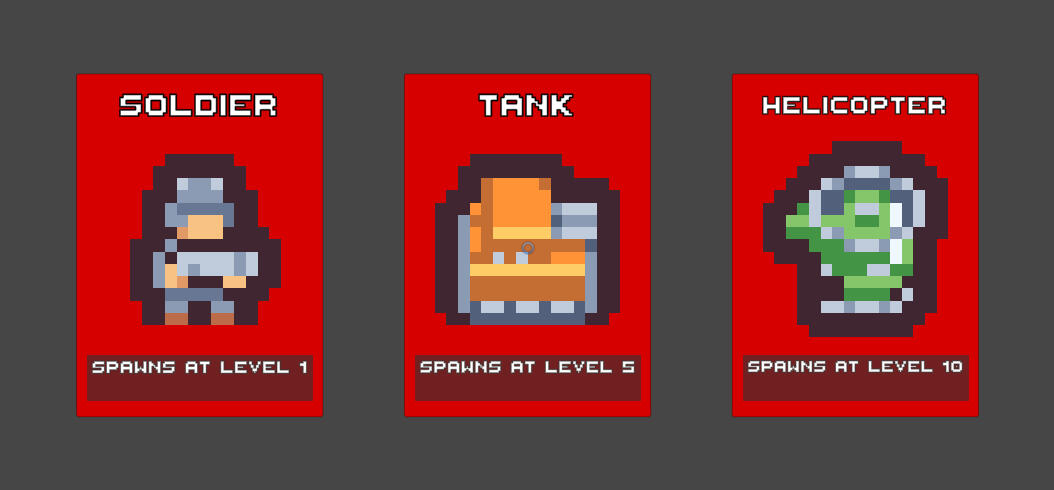
The map is procedurally generated using Perlin noise, with water tiles and land tiles. I’m still polishing the map generation controls.After generating the map, I randomly spawn cities based on size. I pick a land tile to place a city and give it a random radius for size. I check for nearby cities to make sure their areas don’t overlap. I use a spatial hash grid for this, so I don’t waste time checking cities that are too far away.Once the city is in place, I fill it with buildings and add roads. Each city gets its spawn points and faction. The enemies have different spawn values: soldiers are 1 point, tanks are 5 points, and helicopters are 10 points. Each city has a total spawn value, like 30 points, and will randomly spawn units based on that. For example, a city could spawn 2 helicopters, 1 tank, and 5 soldiers.
Enemies
For my enemies, I kept it simple and only added stat differences along with different sprites. Each enemy has a target. If an enemy doesn’t have a target, it will look for the closest one within its detection range.To prevent every enemy from looping through all enemies in the scene, I implemented a spatial hash grid. This way, the enemy only checks about 10 enemies instead of 1,000, making it more efficient.Once an enemy has a target, it moves toward that target until it’s in attack range. When in range, it shoots a bullet based on its attack speed.Enemies can take damage from bullets. If an enemy gets killed, the bullet that finished it off will identify which faction made the kill and grant XP to the appropriate faction.
Enemy optimization
Optimizations
I focused on optimizing the game because I wanted to have a big map where a lot can be happening at once.To do that, I had to implement a spatial hash grid and object pooling.Spatial Hash Grid
I used the spatial hash grid in two different parts of the project. The first time was for the cities. This stops cities from doing distance checks with ones on the other side of the map and only checks cities nearby.The second time I used it was for the enemies. Now, enemies only check distance with other enemies around them. It also helps with updating only the enemies near the player, so I don’t have all enemies running updates even when they’re outside the player’s range.Object Pooling
I set up three different object pools.The first pool was for the enemies. Since enemies are fighting all over the map and constantly dying, using an object pool here was a no-brainer.The second pool was for bullets. Every enemy and the player use the same bullet object; I just change the data, like who shot it and other details, when the bullet gets fired.The third pool was for death particles. I set this up just in case I wanted a death particle that isn’t blood for other types of enemies in the future.
Editor tools
Creating editor tools was a requirement for this project. Initially, I felt that building a custom tool for a game of this scale might be a bit of a time sink. However, as I worked on it, I realized that if I were to scale up the game, having this tool would be incredibly valuable, so I ended up learning some useful lessons along the way.The tool I developed allows me to edit the stats of enemy units' scriptable objects. It doesn’t just stop there, though. It can also create new scriptable objects for enemies, save them directly into the project, and even add them to the spawn list. Now that I’ve added those features, I’ll also need to include options for removing objects from both the project and the spawn list.My first iteration of the tool was a bit clunky. You’d press a button to pull up all the objects, then click on each one individually to open a new screen where you could edit it. While this got the job done, it was slow and disconnected, especially for quick edits or when viewing multiple items.The second version is much more streamlined. Now, everything appears within the same interface. I added a cleaner, highlighted selection for the item you’re working on, and included a search function. So if you’re working with 1,000 items, it’s now much easier to find exactly what you need.
Conclusion
Doing this project was a lot of fun.I really liked working on the optimizations to make sure the game didn’t end up running at 3 FPS. Learning techniques like spatial hash grids and object pooling was a great experience, and it’s something I’ll definitely take with me into future projects. It was cool to see how much smoother the game ran after implementing these systems, especially with how many enemies and objects were on screen at the same time.If there’s anything I’d want to improve, it would be the random level generation and the enemy AI. The random level generation could use a bit more variety, and I think the AI could be smarter, reacting more to the player's actions instead of just moving toward them. These are things I’d like to dig deeper into in future updates or projects.
Sand Simulation
Sand simulation was a fun side project. I used to play this game where you could drop sand, water lava and many more things. This made me think how does the sand simulation work and because 3D seemed a bit hard I chose to do a 2D version.
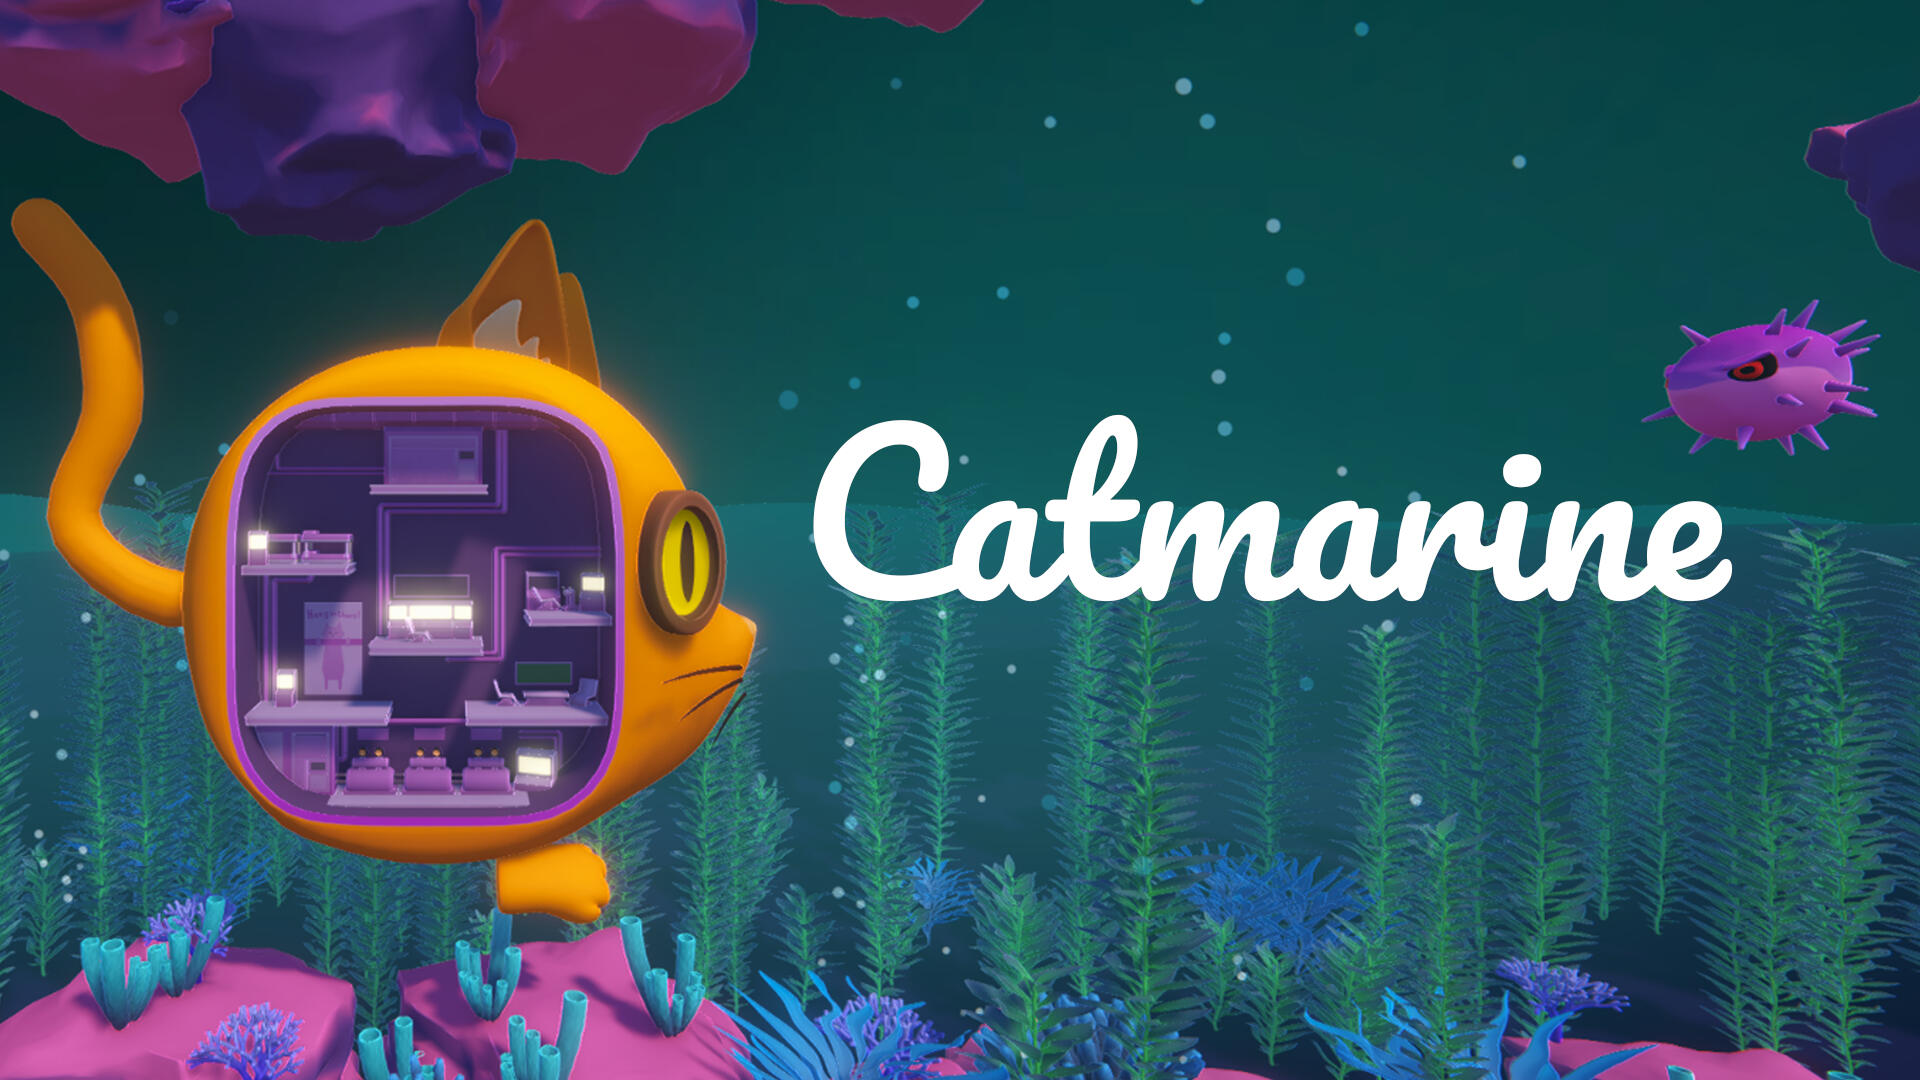
Catmarine
Catmarine was a game-jam game I worked on with 4 of my friends.
The theme was to use the Proton Engine, which is designed to make multiplayer networking easier to work with.Catmarine is an online co-op typing game where players control a cat-shaped submarine together. Everyone runs around inside the sub to different stations that manage movement and weapons. The twist is that everything, including steering, speed, and shooting, only works by typing cat-related puns as fast as you can. It quickly turns into chaos as players try to coordinate their typing to keep the submarine from crashing while dealing with obstacles along the way.
Word System
I was in charge of the word system. This handled all possible words in the game as well as the ones currently active.I started by creating a WordList class that contained a CATegory enum and a List<string> of words. The idea was to support different categories of word lists if we wanted variety later on. In the end, we didn’t end up using that feature, but I think it was a good system to have in place for flexibility.Next, I built the WordBank, which stored all the word lists. On startup, it populated a dictionary for faster lookups, using the category as the key and the list of words as the value. The WordBank also included a function to fetch random words from the bank. When a word was selected, it was added to the active word list so it couldn’t be reused until it was released by the system that had claimed it. This helped prevent dupliCATe words from showing up during gameplay.
Enemies
I also created our enemies: the pufferfish. In our world, they act as obstacles that block the submarine’s path. They stay stationary, and the only way to destroy them is by standing at the shooting workstation and typing out their assigned word correctly.When a pufferfish spawns, it requests a word from the WordBank singleton, which assigns it a unique word that can’t be reused until it’s released. Each active pufferfish displays its word to the players. When someone types a letter, every pufferfish with a matching prefix lights up, and only the one with the fully matched word is destroyed. On completion, it triggers a short explosion animation to clear it from the path.Everyone can type at once, but a word has to be completed by a single player. This created a lot of fun chaos as players tried to coordinate which words to go for. I had started experimenting with a boss version of the pufferfish that would use longer or dynamic words, but I didn’t manage to finish it before the end of the jam.
Conclusion
I really enjoyed the game jam. I’ll admit I shied away from the networking side of things because I didn’t want to be a problem for the team. Looking back, I should have stepped up and tried to figure it out. My fellow programmer was amazing, and I focused too much on not getting in his way, that’s something I want to work on.My goal is to keep developing this game with the group into a small release, and to spend more time on the multiplayer side so I can get a solid grasp of how it works. Overall, the jam was a great experience, and I learned a lot about collaboration and my own habits as a developer.
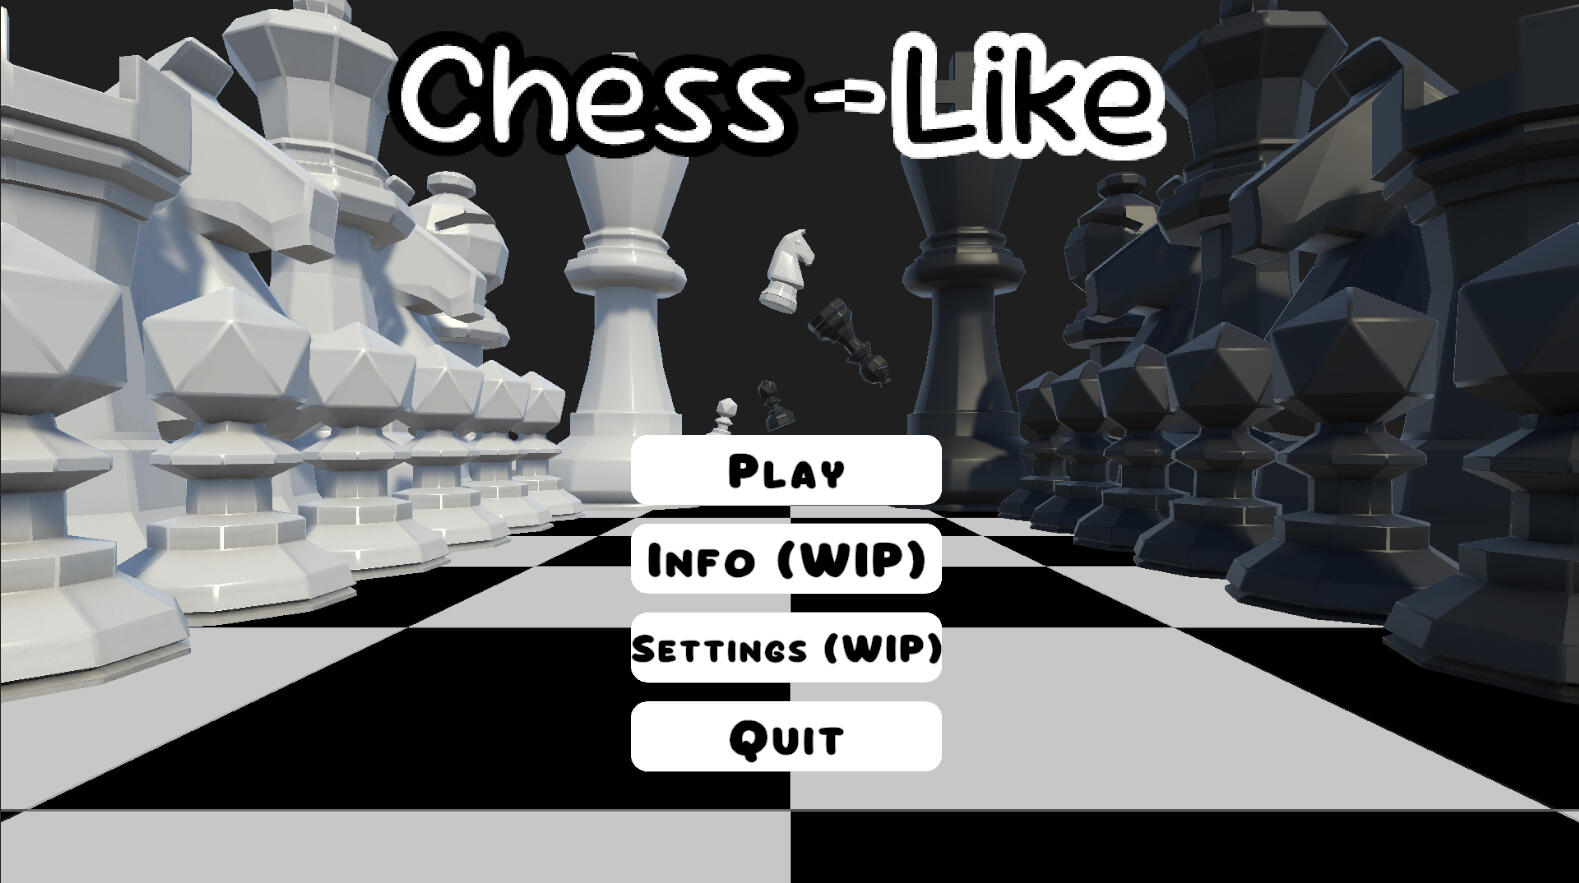
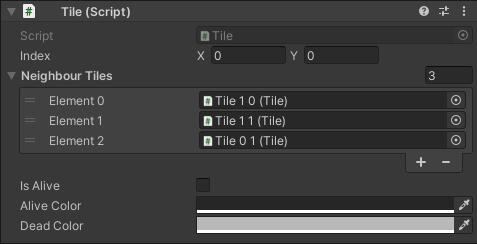
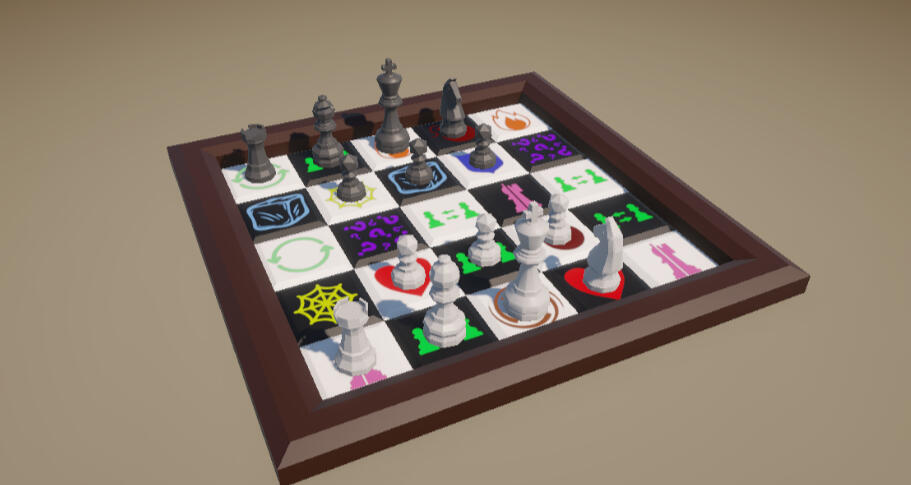
ChessLike
This project was part of my specialization course Advanced Gameplay. It lasted 18 weeks. The final assignment was to create a game using an Action Stack.I created a chess roguelike prototype in Unity using C#.The board is procedurally generated with meshes created through code, while the pieces use standard models. The game features a randomized board with special tiles that trigger effects when stepped on, forming the roguelike elements of the project.The project turned out well, and I am especially proud of the AI system. It can play against itself, allowing me to run automated matches to find bugs and edge cases, which proved very useful for testing.
Action Stack
The Action Stack is the core system used to control game flow and turn handling. It manages all gameplay actions in a structured, sequential way, making it easy to follow and debug.It was a requirement for the assignment, but it proved to be a very effective way to handle a turn-based system.The overall flow is built as a chain of actions:GameMode > Player Turn > Piece Selection > Move Selection > Move Execution
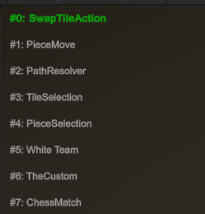
GameMode > AI Turn > AI Calculation > Move ExecutionThe GameMode action acts as an anchor in the stack. When it is reached, it pushes the next turn (player or AI), keeping the loop going.Actions can also trigger other actions during execution. For example, a move action can trigger tile effects, which may add new actions to the stack. This makes it easy to handle chained events in a predictable order.The system supports different types of actions (pure classes, MonoBehaviours, and ScriptableObjects), making it flexible to use across different parts of the project.One of the main benefits was debugging. Since all logic runs through the stack, it was easy to see which action was active and where issues occurred. The built-in visualizer also helped track the current state during runtime.
AI match
Combat
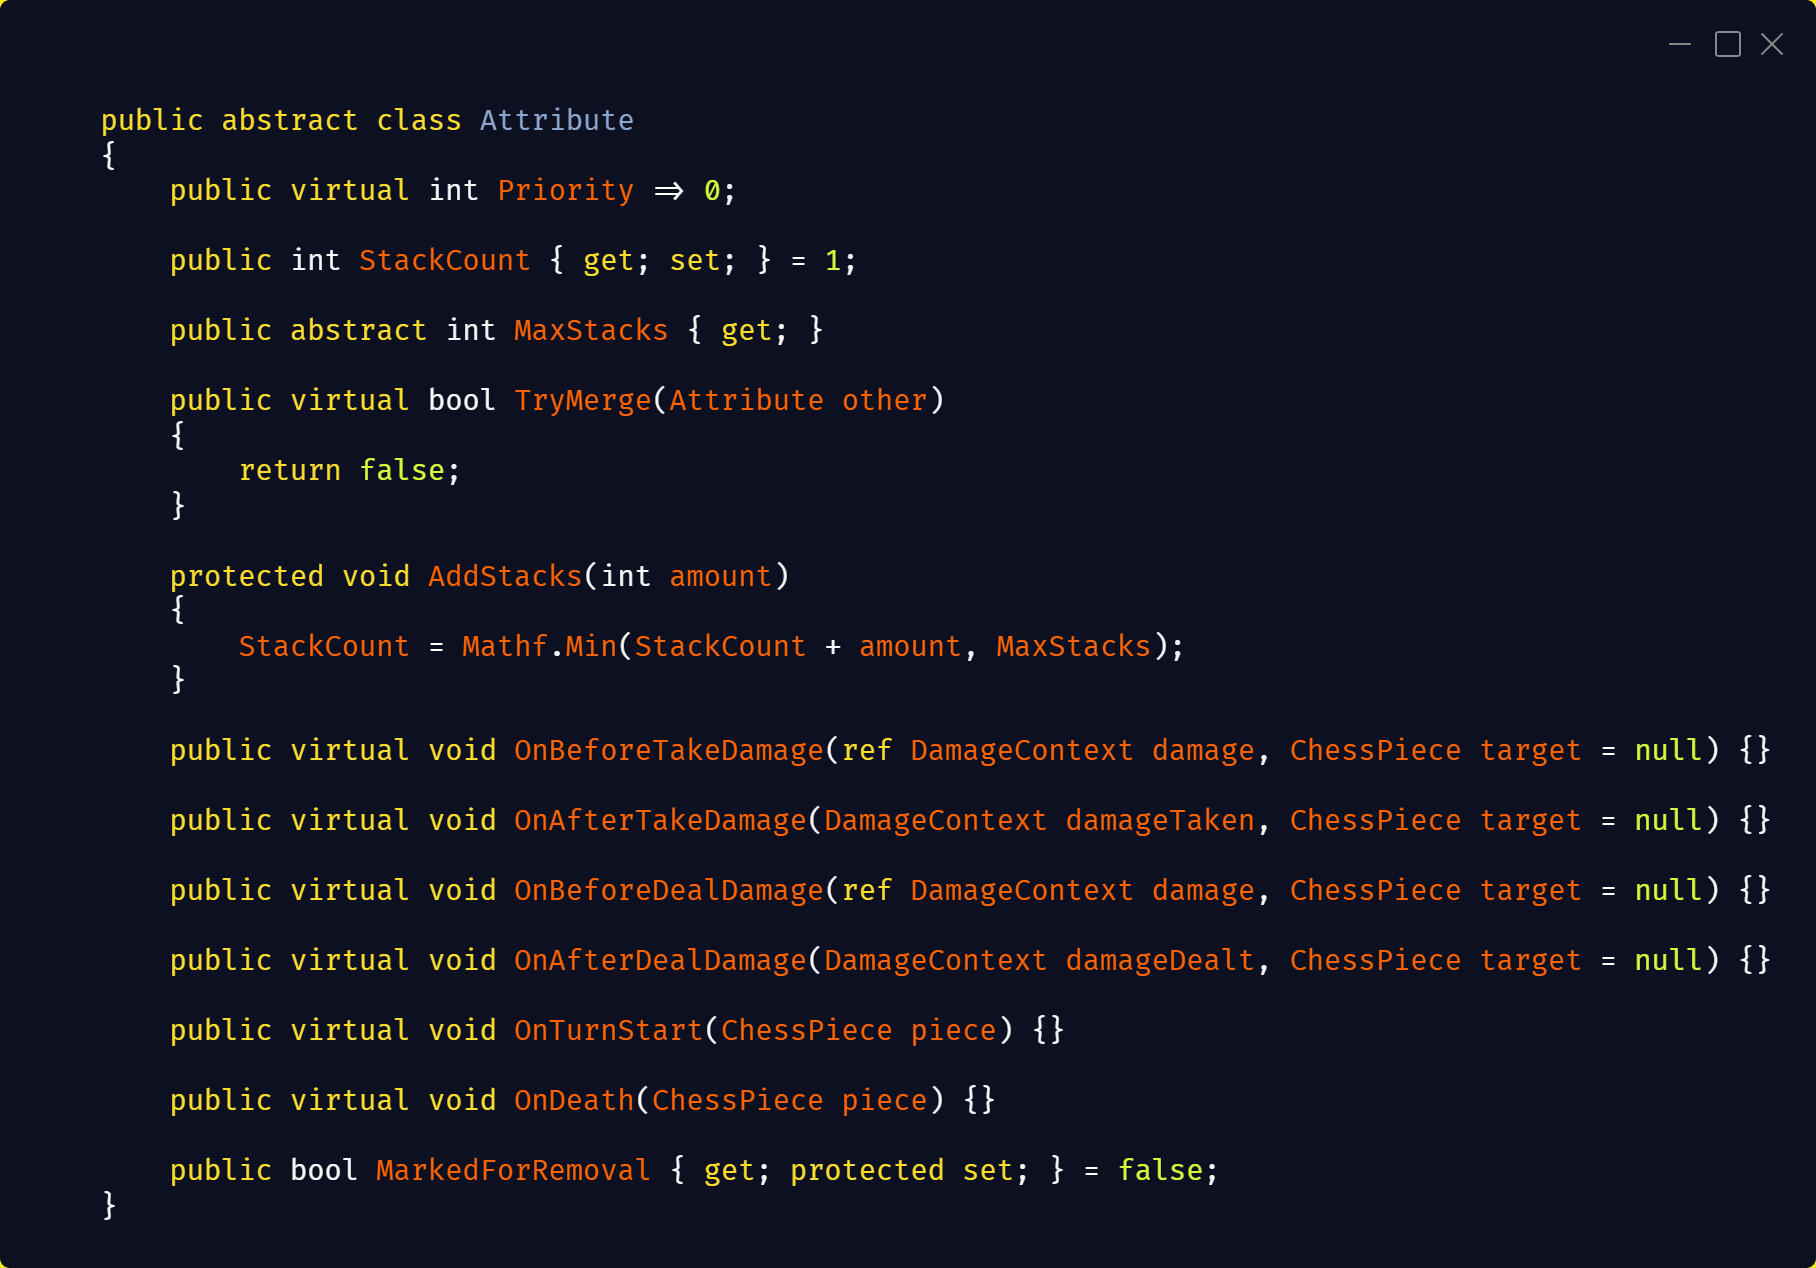
In order to make the game less “capture or be captured,” I introduced Health to the pieces. When a piece is attacked, it now loses health instead of being instantly captured. When health reaches 0, the piece is removed.To avoid situations where, for example, two queens would stand and attack each other for several turns, I introduced a Strength value for each piece. This allows for stronger and weaker pieces, and opens up possibilities for roguelike-style upgrades.The last stat I added was Shield. Shields block all incoming damage once and are then removed. Since this was very strong, I limited the maximum number of shields a piece can have to 3. This also allows weaker pieces to have a fighting chance against stronger ones.I like these stats, as simple as they are, because exchanges are no longer guaranteed.The values and behavior, such as shields fully blocking damage, are implemented in a way that is easy to tweak. For example, shields could instead block partial damage if I want to experiment. My main focus early on was flexibility rather than balance.I knew this alone wasn’t enough to move away from traditional chess, which led me to explore tile-based mechanics.
Tile System
To move the game further away from traditional chess, I introduced a tile system with different effects that trigger when a piece steps on them.The tiles are designed around three categories:Positive tiles that benefit the piece
Neutral tiles that add minor inconvenience or variation
Negative tiles that punish the player, ranging from small damage to instant deathThis creates a balance where tiles add variety without becoming too disruptive or frustrating.Each tile type has a specific purpose and introduces small twists to gameplay, making positioning more dynamic and less predictable.From a system perspective, each tile handles its own behavior and triggers its effect through the Action Stack. When a piece lands on a tile, it pushes a corresponding action (for example damage, teleport, or swap), ensuring all effects are executed in a controlled order.Some tiles also include cooldowns to prevent repeated triggering, which helps avoid overly strong or exploitable interactions.In addition to gameplay effects, tiles provide value for AI decision-making. Each tile evaluates its own usefulness based on the current piece, allowing the AI to consider both risk and reward when choosing moves.
Tile Effects Implementation
As mentioned earlier, when a piece steps on a tile, the tile pushes its corresponding action onto the Action Stack (except for normal tiles).Each action receives a reference to the piece that triggered it. When OnBegin() is called, the tile performs its setup and executes its behavior.For example, the Mystery tile selects a random new tile type and starts a flip animation using a coroutine.The Ice tile gathers all neighboring tiles, filters out occupied ones, and selects a random valid position to slide the piece to.The Bomb tile collects neighboring tiles and applies damage: 2 damage to the triggering piece and 1 damage to all adjacent pieces.Implementing each tile effect as its own action made the system easy to extend and debug. Since all logic is contained within individual actions, issues could usually be traced directly to a specific script.
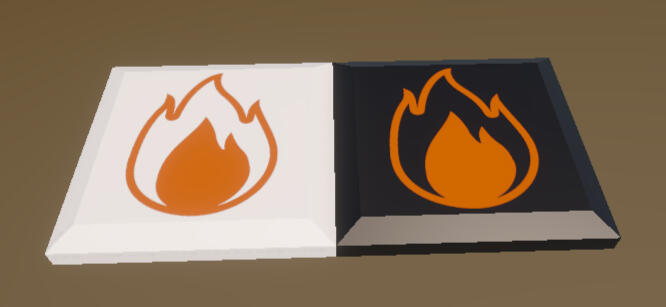
Tile Info
Normal – No effect- Good Tiles -
Healing – Restores health (up to max)
Hit Random – Damages a random enemy piece
Extra Turn – Grants an extra turn to the team (5 turn cooldown)
Armour – Grants shield (max 3); blocks damage and removes 1 shield per hit- Neutral Tiles -
Webbed – Stops movement on path resolve
Mystery – Reveals a hidden tile and triggers its effect
Random Teleport – Teleports the piece to a random free tile (1 turn cooldown)
Swap – Swaps with an allied piece; both trigger their new tiles (1 turn cooldown)
Ice – Slides the piece to a random neighboring free tile (no effect if none available)- Evil Tiles -
Lava – Deals 1 damage on step
Death – Instantly kills the piece
Bomb – Deals 2 damage to the piece and 1 damage to adjacent tiles
Morph – Transforms the piece into a random different piece (excluding king and itself)
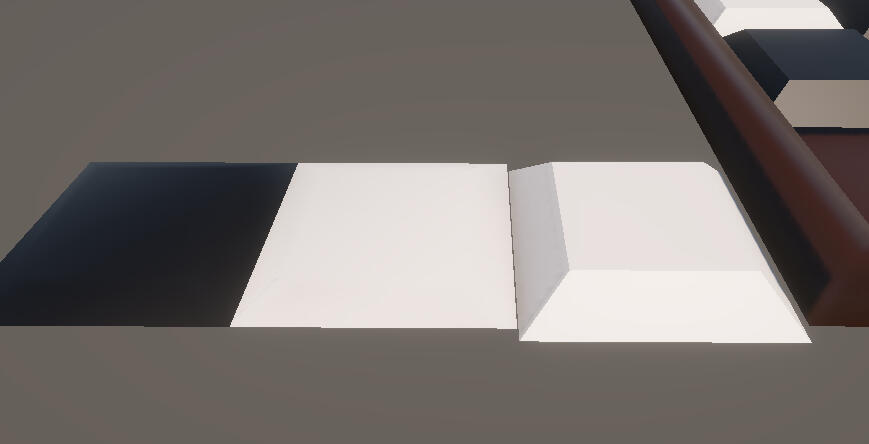
Procedural Mesh Generation
Procedural Mesh GenerationFor a higher grade, we could choose additional features to implement. I chose to work on procedural mesh generation.First Tile Version
I started by generating a simple tile mesh using a cube to understand how vertices and triangles work together. Learning correct winding order was a fun challenge, and I definitely had a few triangles facing the wrong way at first.Second Tile Version
In the second version, I added a bevel to the top of the tile, which required adding extra vertices. This worked, but I wasn’t satisfied with the soft edges caused by shared vertices.Third Tile Version
For the third version, I chose to duplicate vertices instead of reusing them. This increased the triangle count, but since the scene contains very few models, it was a reasonable trade-off. This gave me the hard-edged bevel I was aiming for.Fourth Tile Version
Later, I introduced a “Mystery Tile” that flips when stepped on. This required adding bevels to the bottom of the mesh as well, essentially mirroring the top.Final Tile Version
In the final version, I wanted to display textures on both the top and bottom. I experimented with UV mapping and texture alignment, but these approaches didn’t lead to a good result. Instead, I added separate faces using submeshes for the top and bottom surfaces. Getting the texture rotation correct on both sides took some time, but the result worked well.The tile mesh has a few adjustable parameters, such as height and bevel size. I also added limits to prevent the bevel from exceeding valid values and breaking the mesh.Board Generation
The board mesh followed a similar process. It started as a simple sharp-edged version and was later expanded with bevels. The border made it more complex, as it required additional faces and careful construction. The final result includes several parameters that allow me to adjust the look of the board dynamically.
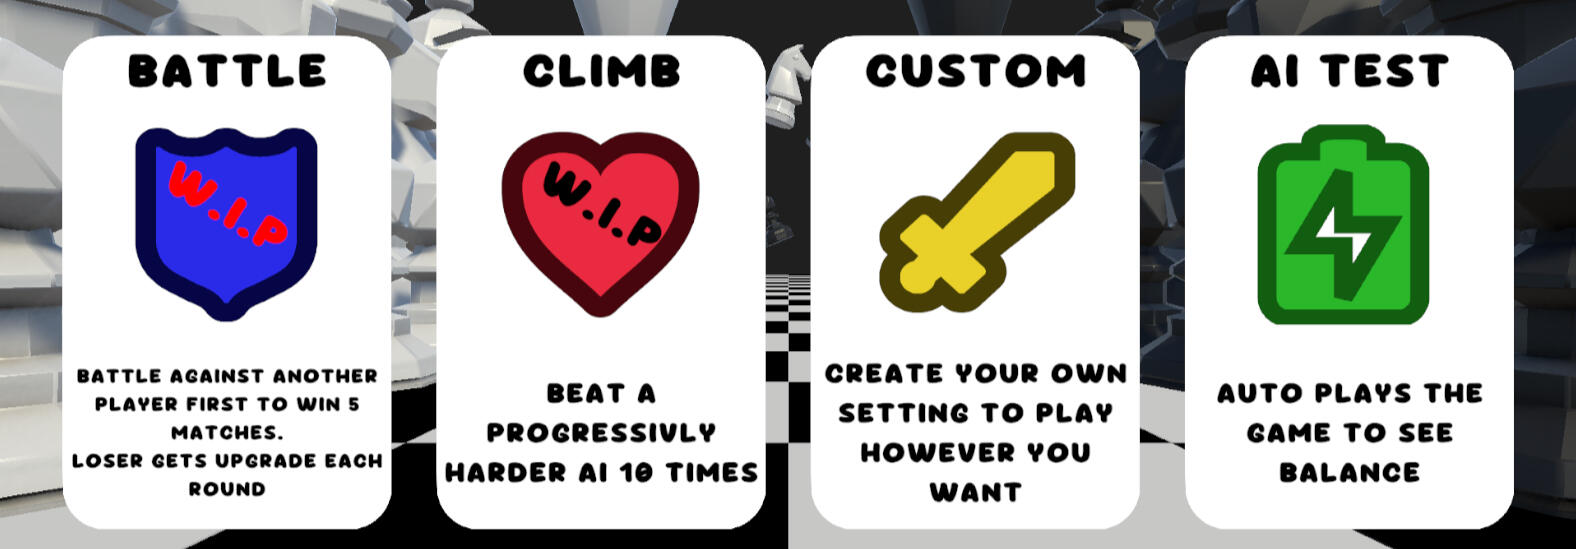
Gamemodes
Because of how the Action Stack is structured, with the GameMode acting as the anchor, it is easy to create and extend different game modes.One challenge was communication between the GameMode and the UI. I did not find a clean solution for this, so I used a UI manager singleton that controls which UI is active. While this works, it is not a solution I am fully satisfied with.The first mode I created was a Custom mode. This allows me to quickly set up games with specific parameters, such as piece placement and team composition. This made testing much easier, as I could quickly create scenarios to test tile interactions and gameplay behavior. It also made setting up AI vs AI matches very simple.Because AI vs AI was so useful, I created a dedicated mode that runs multiple matches automatically. By default, it runs 10 matches at increased speed, allowing me to quickly test balance and detect issues such as the game getting stuck. The number of matches can easily be increased if needed.I also planned additional modes that were not implemented during the assignment:
- A battle mode where players receive upgrades or downgrades between rounds
- A roguelike-style progression mode where players face increasingly difficult AI opponents and earn rewards between stages
AI System
One of my personal goals for this project was to create an AI system flexible enough to support AI vs AI, Player vs AI, and Player vs Player. AI is not something I had much confidence in before, so this was a deliberate challenge.The AI works by evaluating all possible moves for each piece. For every piece, it calculates all valid paths and then scores each possible move.The score is based on multiple factors:The value of tiles along the path
The value of the target tile
Potential captures, including bonus value if a piece can be eliminated
Special tile interactionsThis means the AI evaluates not just the final position, but the entire path taken to get there.After evaluating all moves, the AI selects the highest scoring option. A small random factor is added to prevent it from always making the exact same decisions.During development, I noticed that without randomness the AI would always make identical choices, which made matches predictable. Adding a random offset improved variation, but introduced a new issue where the AI could ignore obvious captures (for example, a queen not taking a pawn). To fix this, I adjusted the evaluation to prioritize attacking moves, ensuring important decisions are not overridden by randomness.This approach works well with the tile system, as each tile provides its own value. This allows the AI to naturally adapt to different board states without needing special-case logic.The system is relatively simple and does not use deep lookahead (such as minimax). Instead, it relies on a greedy evaluation of the current board state. While this means it can make suboptimal decisions, it was sufficient for this project and worked well in practice.One of the strengths of this system is that it can run full AI vs AI matches. This was useful for testing, as I could simulate many games and observe edge cases and unexpected behavior.
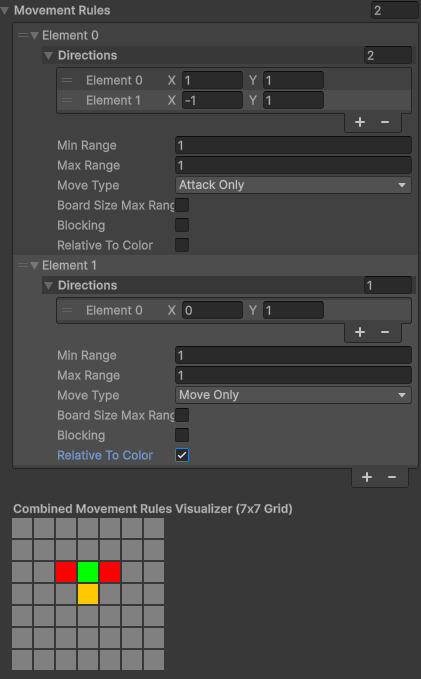
Editor Tool
Movement Rule VisualizerTo make working with piece movement easier, I created a custom Unity editor tool that visualizes movement rules directly in the inspector.The tool renders a 7x7 grid centered on the piece, showing all possible moves based on its movement rules. Different colors represent different move types:Green: movement
Red: attack
Blue: special
Mixed color: move and attackIt combines multiple movement rules into a single view, making it easy to understand how a piece behaves without needing to test it in-game.This was especially useful when working with more complex or modified movement patterns, as it allowed for quick iteration and immediate visual feedback.
Conclusion
I learned a lot during these 18 weeks. I challenged myself to try new ways of coding, and I’m happy with how the game turned out. Even in its current unfinished state, it is enjoyable to play.I plan to continue working on this project. My next step is to explore automated testing as part of my graduation project, which will also be added to my portfolio.I would like to thank Carl Granberg, Oscar Kamf, and Martin Andersson for their guidance and support throughout the course.A special thanks to my girlfriend for helping with playtesting and providing feedback on the design.

Chess-Like Automated Testing
This project is a continuation of my specialization project, where I explored and implemented automated testing in my chess-like game. I spend 5 weeks on this project and enjoyed every step of it.Before this, my only exposure to automated testing was from a VIDEO showing how it was used in Minecraft. It made me very interested, but I was also hesitant to try it myself.For this project, I decided to take that step and implement it in my own game. The result was extremely valuable and changed how I approach development.
Why Automated Testing
Automated testing has always intrigued me because of how easily small bugs can slip through the cracks.While automated testing cannot replace QA, I believe it can reduce the workload and allow QA to focus more on deeper testing rather than repetitive checks.Before this project, I assumed automated testing required extremely complex setups and large-scale infrastructure. Through this work, I learned that it can be much more accessible. I was able to run 184 tests in about 7 minutes on my own machine.Automated tests run the same way every time, removing human error such as timing or missed steps. This makes them especially useful for consistent validation and repetitive testing tasks.These advantages motivated me to explore and implement automated testing in my own project.

Determinism / Reproducibility
When I started working with automated testing, I quickly saw the importance of being able to reproduce the same game state every time.Originally, the board was generated randomly from a list of tile types. This meant that even with the same input, the board would be different each time, which made reliable testing difficult.To solve this, I refactored the system to allow full control over the game setup. I already had a system for placing pieces based on rules (for example, pawns not being on the first row and the king being centered). I extended this by saving the generated setup into game settings.This allows me to create specific scenarios with exact piece positions and tile types, ensuring that tests always run under the same conditions.This change made testing much more reliable and also improved debugging, as I could consistently reproduce issues.It also influenced how I think about system design. When possible, I now try to structure code in a way that supports reproducibility, as it makes both testing and debugging significantly easier.While I did not use random seeds in this project, I am interested in exploring them in the future as another way to control and reproduce game states.
Testing Existing Features
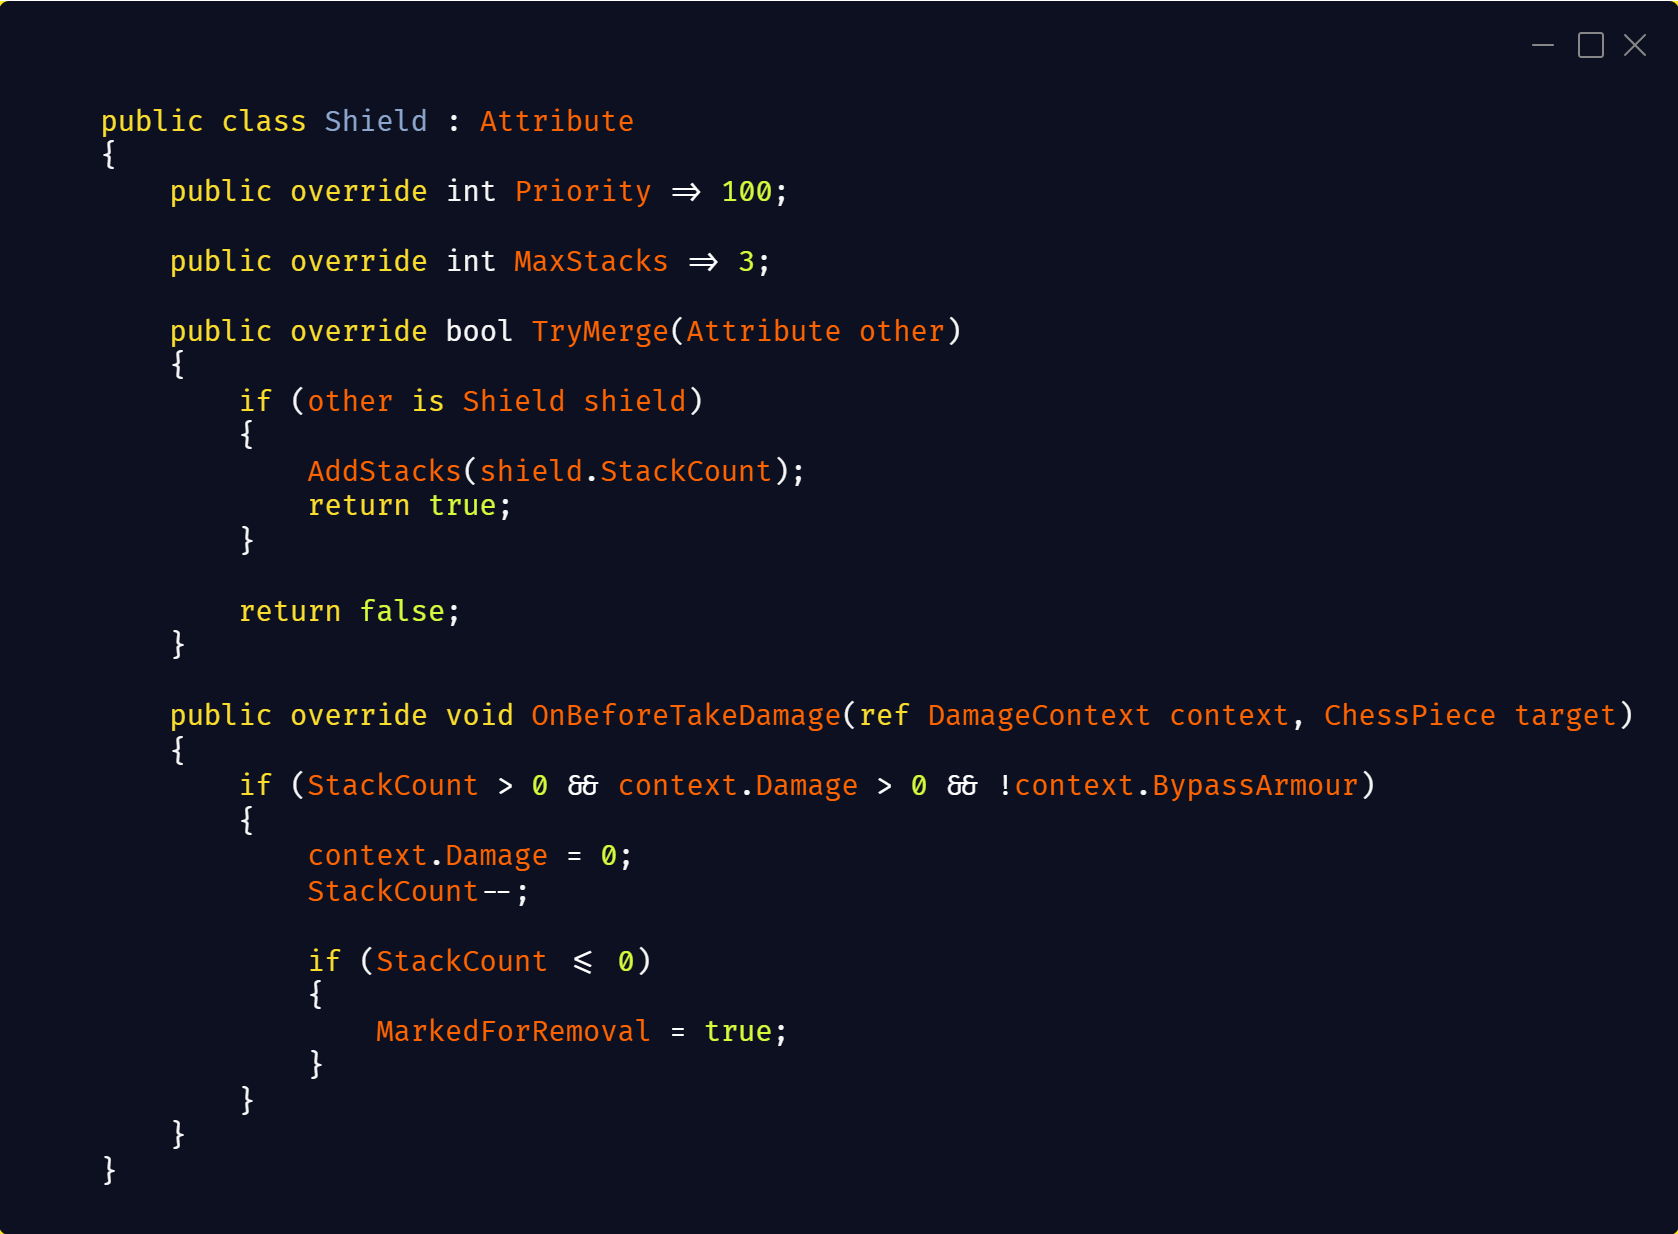
I started by creating tests for the special tiles from my Chess-Like project. The first tile I focused on was the Shield tile.This allowed me to test multiple interactions:Moving onto the tile to gain shield
Taking damage and losing shield
Interacting with other tiles such as Bomb and DeathThe tests were structured around multiple scenarios for each tile, making sure different interactions behaved correctly.These tests helped verify that tile interactions behaved correctly across different scenarios and prevented regressions when making changes.First Version
The first version of the tests was quite bulky, with a lot of manual setup and waiting.After some iteration, I was able to move pieces to specific tiles. These movements did not strictly follow normal game rules (for example, moving a pawn across the board freely), but they used the same underlying movement and attack functions. This allowed me to isolate and test functionality without being blocked by gameplay constraints.While the setup worked and allowed me to create specific board states, the code quickly became difficult to maintain and read.Final Version
To improve this, I created helper functions to encapsulate common setup logic. This made the tests much easier to write and understand.I structured the tests using an Arrange–Act–Assert approach. In some cases, I also used assertions between steps to ensure the setup was valid before continuing.I also simplified the board setup by reducing it to only the size needed for each test, which improved clarity.All tests were written as PlayMode tests, since they rely on systems like the Action Stack and piece movement. This allowed me to test gameplay behavior directly in a way that matches how the game actually runs.
Old Version


Final Version


Testing While Developing New Features
Choosing the Feature
After creating tests for existing features, I wanted to try writing tests while developing a new system.The feature I chose was an attribute system, where pieces could have effects such as strength, shield, poisoned, etc. This introduced many interactions, making it a good candidate for testing.Previously, shield was just an integer value on the piece. With this system, I wanted it to be part of a more flexible structure where effects could trigger at different times.Reusing Existing Tests
After creating the base system, I implemented the shield attribute first. Since I already had tests for shield, I rewrote them to work with the new attribute system. This meant I had tests ready before fully implementing the feature.Catching Issues Early
When I ran the tests (15 in total), most passed on the first try except for one. The test checked that the maximum shield value should be 3. I had forgotten to implement this limit in the new system.This is something that would likely have gone unnoticed until much later, especially when adding more attributes. Fixing it early saved me from potentially having to refactor multiple systems later.Development Workflow
The other attributes followed a similar pattern:
- Create base functionality
- Set up tests for interactions
- Implement the feature
- Run tests and adjustDeveloping tests alongside features made iteration much faster. Running tests was quick, and I could immediately see if something was working or not.Debugging with Tests
The most useful cases were when some tests passed and others failed. This helped narrow down where the issue was. There were also cases where the tests themselves were incorrect, which required validation as well.While it adds some overhead, once the tests are in place it significantly speeds up development and increases confidence in the system.
Reflections
Learning Curve
Writing tests felt very slow at the start. My first ones took 1–2 hours each, which made me question if I was doing it correctly or if it was even worth the time. After writing 250+ tests, that dropped to around 1–2 minutes per test. The structure became familiar, and adding new tests was no longer a bottleneck.Impact on Iteration
The value became clear once I started modifying systems. Instead of manually setting up scenarios in-game (placing tiles, configuring teams, reproducing edge cases), I could run tests and immediately see what broke. Without tests, reproducing specific situations would have taken a lot of time and repetition. With them, iteration became much faster and more reliable.Impact on Code Design
Testing also influenced how I design code. I started writing functions with testability in mind, which pushed me toward more modular and predictable systems. The Action Stack helped a lot here, since I could call actions like PieceMove or PieceAttack directly and validate behavior without needing a full game setup.Limitations & Edge Cases
I also ran into limitations. In one case, a failing test led me to spend several hours debugging what looked like a gameplay issue. It turned out the problem was incorrect test setup, I had placed a piece on an invalid tile, which created an inconsistent state. The system allowed it, which exposed a real weakness. I fixed this by adding validation and writing a test to prevent that scenario. This showed that tests can also reveal issues in setup and assumptions, not just gameplay logic.I chose PlayMode tests because my code depended on Unity components like MonoBehaviours and wasn’t structured for unit testing. While slower, this gave me confidence that systems worked in a more realistic environment.Takeaways
Overall, this changed how I approach development. Testing is no longer something extra, but part of how I build systems. It helped me catch issues earlier, reduce debugging time, and feel more confident when making changes.That said, testing doesn’t replace everything. It works well for functionality, but not for visuals or game feel, so QA is still important.